
文章目录
Add RTSP source
Click "Add" to configure the relevant parameters in the pop-up dialog box, and click "OK" to add a video source.
Under the same name, you can add two URL addresses, one main stream and one sub-stream. The main stream is used to decode the output, and the sub-stream is used for previews. If only one main stream address is filled in, both the preview and output will use the main stream.
NOTE:First of all, we need to get the correct video source URL address from other platforms. The abnormal video source address will cause the device to not work properly. (Video source can be tested by VLC player.)
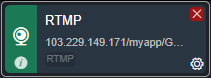
The above picture shows how to add an RTSP source as an example, other types of video sources operations are the same, the relevant parameters please refer to the below table.
The parameters of the video source are defined as follows:
| Name | Video source name, can be set arbitrarily, support mixed Chinese and English |
|---|---|
| URL Address | Support RTSP, RTMP, RTMPS, UDP, HTTP and other protocols, decoder can automatically identify the URL address. After entering the URL address, if some advanced parameters are configured, the dialog box will automatically pop up to configure the corresponding parameters. You can also click on the protocol options on the page to set the parameters directly. |
| Transmission Mode | Choose TCP or UDP TCP is a reliable transport protocol and UDP is an unreliable transport protocol |
| User/Password | Configuration is based on whether or not the video source is authenticated by the user. Normally, no configuration is required. |
| Decoding buffer and delay | For a variety of different application scenarios and networks, to balance of delay and fluency of the decoding, the device provides a variety of buffering strategies for users to choose.Zero buffer, 50ms, 120ms, 200ms, 500ms, 1s are optional. Users can choose on actual network conditions, good network with lower latency, and poor network with higher latency. |
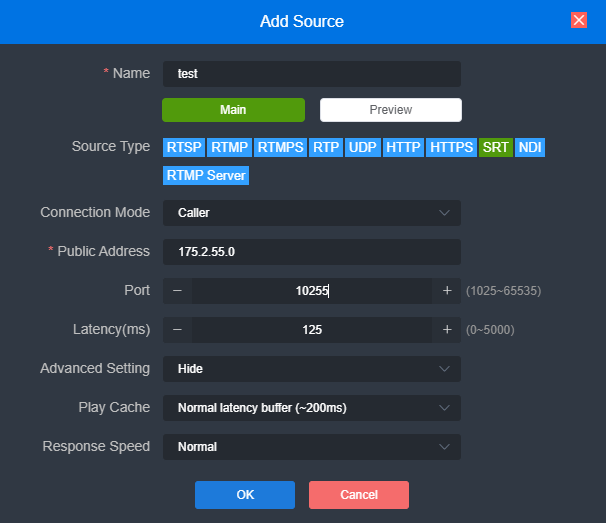
Add SRT source
- Add a SRT source in the page of video decoder by "Media"–"Add Source"–"SRT".
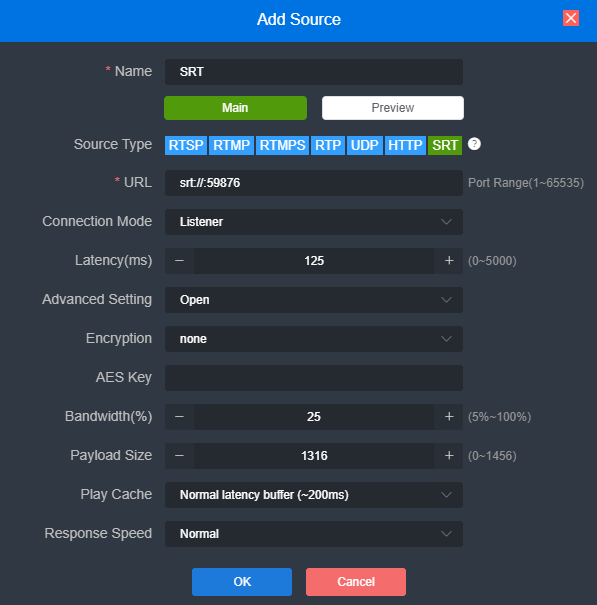
SRT Setting parameters means the following:
- Name: You can name it freely, supporting letters and numbers combination;
- Connection Mode: Caller、Listener、Rendezvous;
- URL:When using CALLER mode, the URL address format is: srt://the-other-end public IP address: port, and when using Listener mode, the URL address is: srt://port
- Address: Set IP address of the receiving port;
- Port: Configure a listening port which should be consistent with the sending port;
- Latency: please set it according to the configuration of the video encode and the final delay will be the larger one between encoder and decoder. Default is 125ms;
- Encryption Mode/AES KEY : AES-128, AES-192 and AES-256, it should be the same as the sender;
- Key: encryption key, according to the encryption method to fill in 10-32 letters or number combinations;
- Bandwidth Overhead:The percentage value set based on network link quality. Multiply this percentage value by the total AVIS code rate encoded by the encoder to obtain the maximum bandwidth footprint allowed by Bandwidth Overhead, which is the threshold for the current SRT transmission bandwidth and the maximum bandwidth that the SRT stream can use. As understood from the "overhead" point of view, it is the media content required for transmission (which can be understood as the payload of the load), the additional "invalid" bandwidth to occupy, but it is different from our common protocol overhead, TCP first overhead, UDP first overhead, where the bandwidth overhead is not a fixed 20 to 60 bytes TCP first overhead or 8 bytes UDP first overhead, but according to network conditions change in real time, the network link conditions are worse, the more normal transmission. The setting range is 5% to 100%, and the default size is 25%.
- Payload size: Please keep the same settings as the sender, the default one is 1316.
- Please add the SRT source to the output window, and the decoder starts to listen for SRT requests, it will establish the SRT connection while receiving the right SRT "Call", and decode then output video.
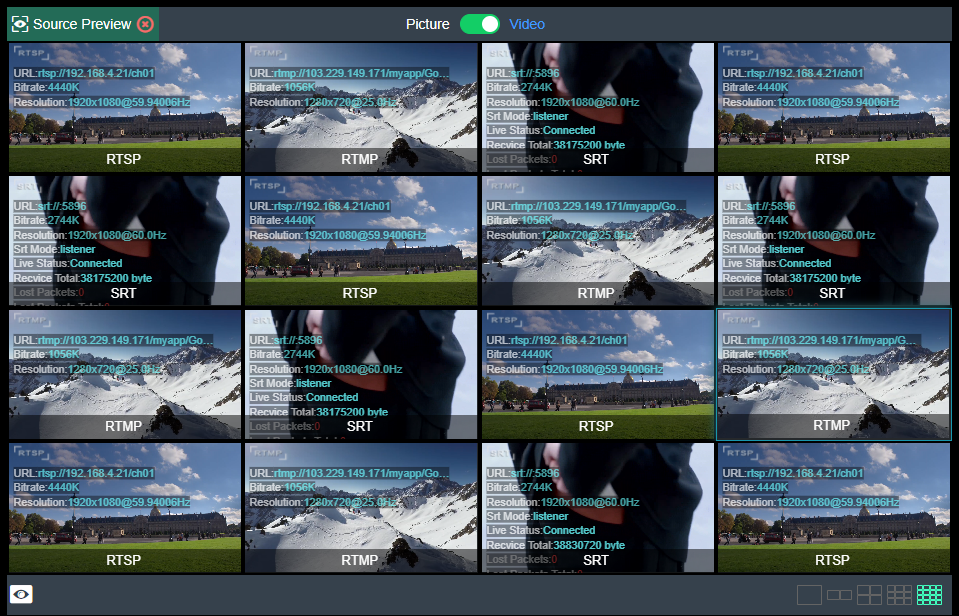
Video sources list
This list shows all the video sources and source parameter information you added, not all of them are decoded. To decode the output, you need to manually drag it to the upper output area to decode. When the video source is shown as green "View/Pull", the video source is decoded or pushed; the representative displayed as gray "Off" is not used as decoding source; Shown as blue "Connecting" indicates that the source is establishing a connection ready for decoding and the Yellow "Connecting/Reconnecting" indicates that the source is decoding abnormally in the decoder and tries to connect and decode. Shown as a red "take stream" indicates that the source may be wrong and does not support decoding.

NOTE:It is non-decoding status, after video sources being added. You need to drag it into the above output window, then the device starts to connect to the source and decode it.
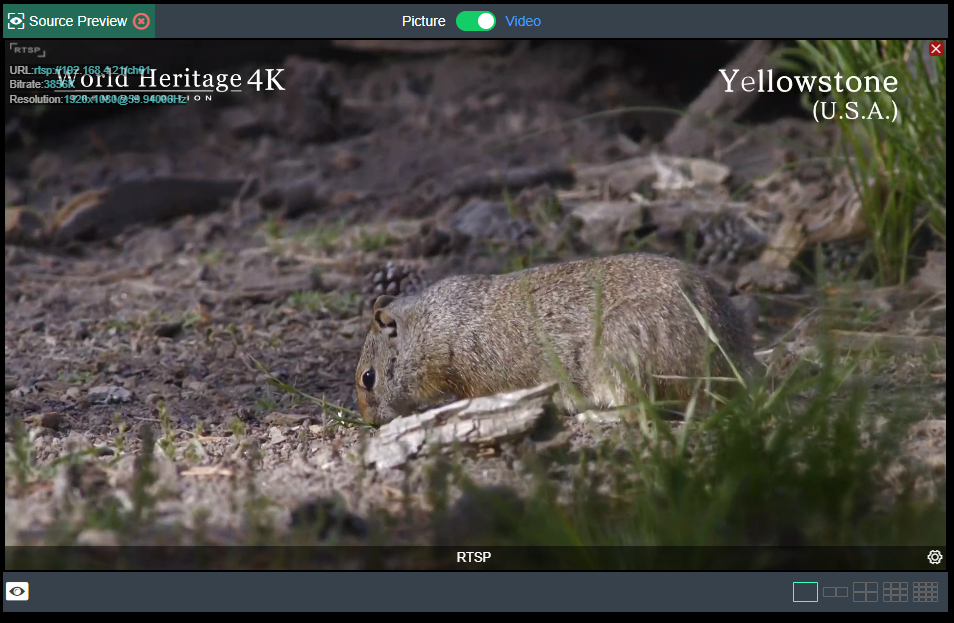
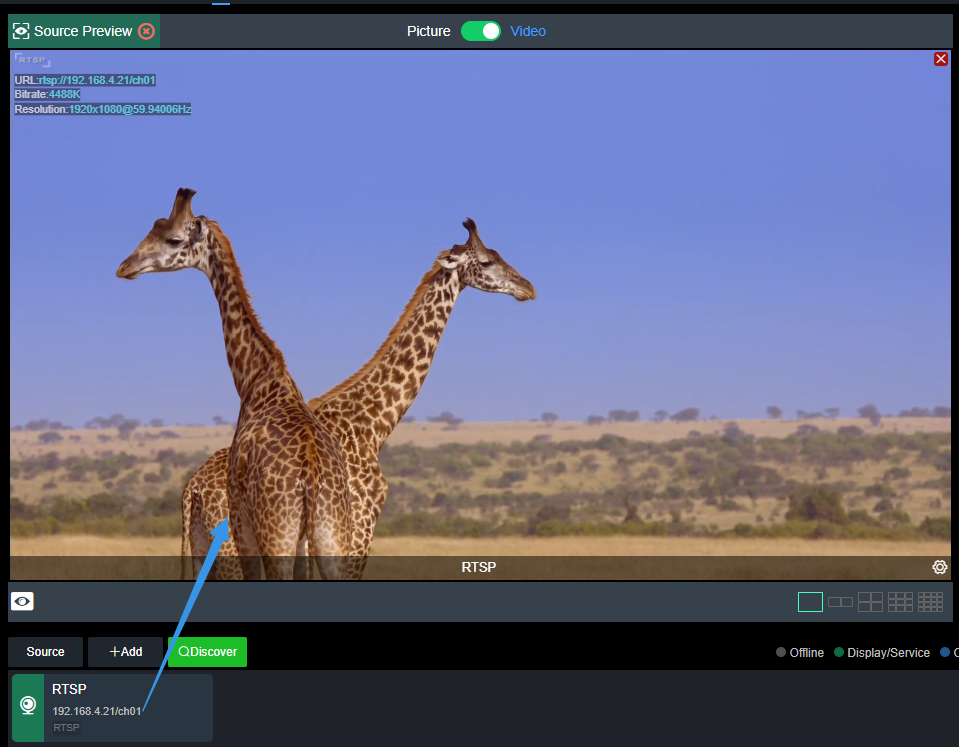
The source preview
Supports local preview of video sources through web pages, with a click in the upper left corner to turn off the preview function. Through Picture/video switch button, you can switch picture or video preview mode.
- Support picture/video preview. If you use pictures in the preview, you will see the picture stream, which is expressed as a picture change in about three seconds; when you use the video preview, it is a smooth video;
- The preview function mainly consumes the computer’s CPU/GPU performance. If the multi-screen preview is freezing, it may be related to your computer performance;
- Preview supports 1/2/4/9/16 split screen, up to 16 split screen previews;
- Required browser: the latest version of Google and Edge;
- Only support for local preview in the same LAN for the computer and device, and cannot preview across WAN;
- Display of decoding status and source parameter information.
NOTE:Browser preview does not support video sources with B-frame encoding.
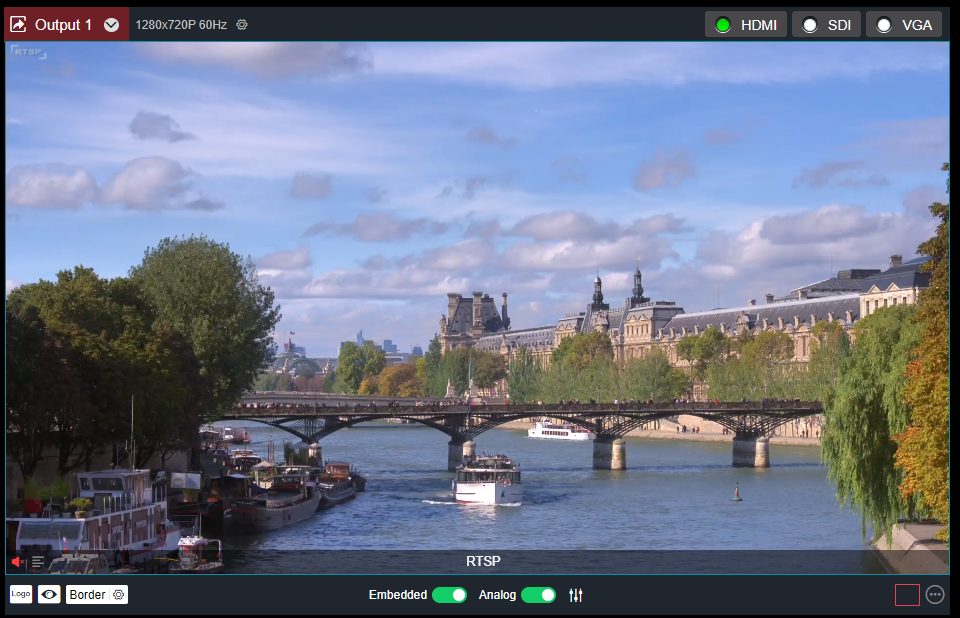
Video output setting
The decoder supports H.264 decoding and can support dual interfaces of SDI and DVI (compatible with HDMI and VGA) to simultaneously output the same and different signal sources or split screen pictures.
The decoder WEB page has three output window, corresponding to the two hardware interfaces of SDI/DVI. You only need to drag the added video source to the corresponding output window, and the decoder will start decoding. Take "Output 1" as an example to illustrate the control of the output window in detail (as shown in the following figure):
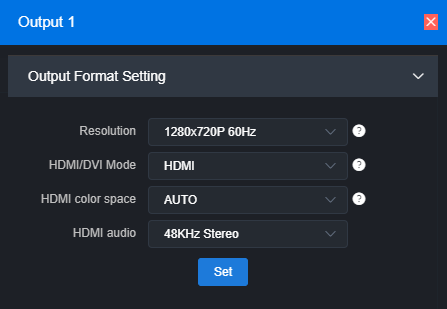
Click the settings button to set the video output parameters
NOTE:This window is only an operation window, which can not preview the decoded video output. If you want to watch the decoded output video, you need to connect DVI / HDMI / VGA or SDI display for viewing.
-
Setting Video Output Parameters
Resolution:
Support SDI&DVI/HDMI/VGA (up to 1920x1080P60Hz) multi-resolution configuration. All the resolutions labeled SDI only are valid on the SDI output interface. On the HDMI interface, the output is the resolution closest to this resolution.
HDMI/DVI Mode:
Three modes can be selected: automatic mode, HDMI mode and DVI mode. If "Automation" is selected, the HDMI/DVI mode will be automatically selected according to the EDID description of the HDMI device connected. In DVI mode, the color space and audio parameters will not be set.
HDMI color space:
Optional "automatic", "RGB444", "YCBCR444", "YCBCR422", "YCBCR420". If "Automation" is selected, an appropriate color space will be automatically selected according to the EDID description of the HDMI device connected. If the output is not normal in this case, please choose the right HDMI color space by yourself.
HDMI audio:
32K/44.1K/48KHz dual channel is optional. Please choose according to actual needs, default 48KHz. -
Display current video source information
It can display the current output of the video source name, current bit rate and other parameters. -
Setting up the way of video output
Three output modes, HDMI (compatible with DVI) / SDI / VGA, can be selected. Click to select the output mode to become green, that is to say, it is selected. Select HDMI to represent the current signal source will be output to the HDMI interface; select SDI to represent the current signal source will be output to the SDI interface; select VGA to represent the current signal source will be output to the VGA interface.
Two output windows can choose the same signal source and screen splitting, or can be set to different signal sources and screen splitting. -
Audio switch
Click It can be set to turn on and off audio output
 -
Icon switch
Click It can set On/Off Overlay LOGO Display, Click
 It can set background overlays on and off , Click
 It can set turn source status and information display on and off,Click
 It can set border overlays on and off.
 -
Audio gain setting
It can set the “Digital” and “analog” audio gain ,or turn off analog audio output. -
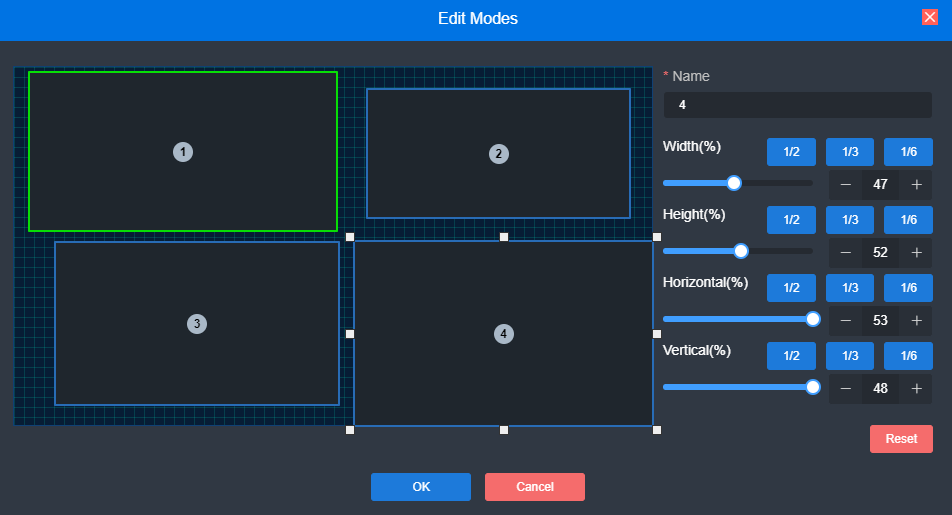
Screen splitting settings (only supported by DC230)
DC230 decoder can display four split-screen modes, with 1/2/3/4 split-screen, supporting up to 4 channels 1080P30 or 2 channels 1080P60 or less. By clicking on the right-hand expansion button, you can set the split-screen mode you want to display, available in 1-4 options. Within the expansion button, the selected split-screen mode is bright and the unselected split-screen mode is gray.
Click “Add Layout” to go to the layout editing page. Select a split-screen layout, you can drag the size and overlay the picture-in-picture at will for multiple screens in the layout, and you can modify the layout in real time when the layout is in use.
-
Video Source Settings
Click the settings button to modify the parameters of the video source; Click“X”button to delete the modified video source; Click“i”, then pop up video source parameters and decode status information.
Pictures and OSD overlays
Image overlays are divided into logos and background overlays, starting with uploading images that need to be superimposed in image management and then overlaying them in overlay settings.
-
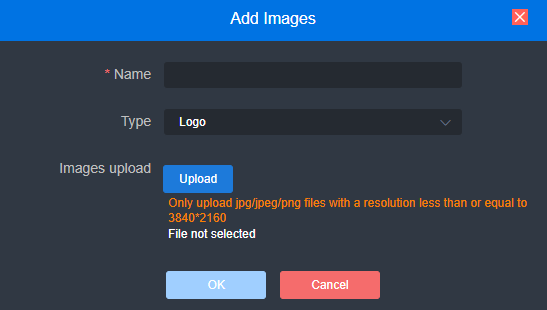
Picture management
On the page "Picture Management" – "Add Pictures", in the pop-up add box, fill in the name, Logo/background, choose to upload a picture, and then click “Save”.
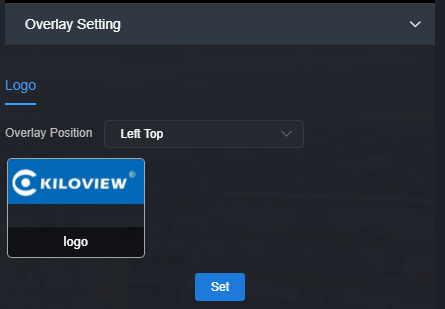
Click the output (1/2) box setting and select your picture or logo. You can overlay your Logo either place on the Window. After clicking "Set" to save, you can see the overlaid effect on the output screen.
NOTE:Overlay Logo image pixels should not be too large, otherwise too much video will be overwritten. The picture format only supports JPEG and PNG.
-
OSD overlay
First, you can have an overall configuration for the overlay and adjust the overlay position. It allows you to adjust the character’s position in the display according to the actual situation.
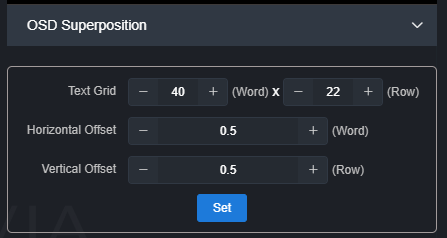
- Screen grid: Divide the screen into horizontal M grids and vertical N lines, each character occupies one grid;
- Horizontal shift: Adjust character position in the horizontal direction of the screen. The unit is character.
- Vertical shift: Adjust character position in the vertical direction of the screen.The unit is character.
Then set the overlay parameters, select "Overlay Type", and configure the overlay function separately for the "Text" and "System Time" and "the overlay items".
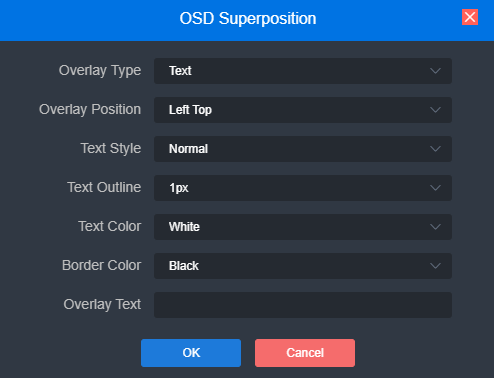
- Overlay type: "No superimposition, text, date, time and date/time" can be selected;
- Overlay position: 7 preset display positions and custom positions can be selected, and the display position of characters after overlay can be selected according to actual needs;
- Horizontal position: when the overlay position is customized, adjust the character shift based on the global horizontal shift setting;
- Vertical position: When the overlay position is customized, adjust the character shift based on the global vertical shift setting;
- Text style: normal and bold;
- Text outline: 0-10px;
- Text color: optional;
- Border color: optional