
文章目录
4G network connection
Introduction:
The device can support up to 5 networks transmission: 1. 2 internal 4G modems + 2 USB extensions 4G modems + one WIFI 2. 2 internal 4G modems + 1 USB extensions 4G modems + one WIFI + one Ethernet.
When inserting 4G USB modems, there are two modes: one is “MODEM” mode, the other is “ETHERNET CARD” mode. In the MODEM mode, it will be recognized as 3G/4G Modem 3 or 3G/4G Modem 4. In the ETHERNET CARD mode, it will be recognized as USB network connection 1 or USB network connection 2.
The device does not support hot swapping of the SIM card, please insert the 4G SIM card when the device is off, or restart the device after inserting the SIM card
Login to the device Web page, click “Network & Service Settings” – "Network interface management", and click "Settings"-"Add a new wireless WAN connection" of the 4G card.
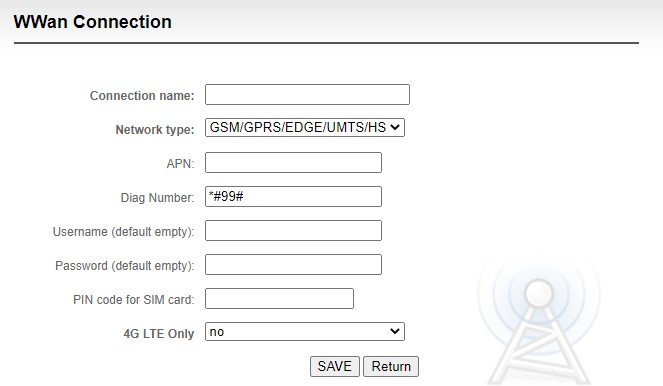
Introduction:
APN: Fill in the correct APN according to different operators. If you are not sure, please contact your local 4G card operator.
For more information about network configuration, please visit Kiloview official website:
https://www.kiloview.com/en/support/docs/p2/user/login-and-network-configuration/network-config/
KiloLink platform deployment
Please make sure that your KiloLink server have been updated to the latest version, please refer to: https://www.kiloview.com/en/support/docs/kilolink-bonding-platform/kilolink-bonding-platform/
Device connection
Click “Device management”-“Add device”,configure the parameters and generate an authorization code.

Introductions:
Serial Number: Login to the device Web page to get the Serial Number in the lower left corner of“System Information”, which consists of 9 figures. Name: Any combinations of alphabets, numbers and symbols. l Authorization Code: Click “Generate Auth Code”, then an authorization code combining with letters and numbers will be generated automatically, which will be used for device registration.
Owned User: The added devices can be visible to a certain user you assigned. All devices will be displayed under the management account.
Private: After selected private, the added device will only be visible to yourself and the management account (admin).
Step 2: Device registration
Login to the device Web page, click “Network & Service Settings”–“Connect Bonding Server”, and configure the parameters to start the bonding service.
Introduction:
Please make sure that your device firmware has been updated to the latest version, please refer to Chapter 9 "Firmware Upgrade" to download and update the device l Server address: The IP address of the bonding server, which support domain names.
Port: The default port is 60000.
Auth Code: Generated when adding the device to the bonding platform.

Streaming service
Login to the KiloLink bonding platform webpage, click any area in the line of the online device under “Device Management", and the device streaming service and video preview window will pop up.
Introduction:
Streaming with the streaming service of the bonding platform, all traffic will be transmitted through the aggregation link. If the streaming service is pushed on the web page of the device, it will only be transmitted through a single network, and the network link is not selectable.
The maximum bitrate of the streaming cannot exceed the code rate configured on the encoder. When the network link bandwidth is not enough, the streaming service will adaptively reduce the output bitrate.
For more information of the KiloLink bonding platform streaming service, please visit: https://www.kiloview.com/en/support/docs/kilolink-bonding-platform/kilolink-bonding-platform/