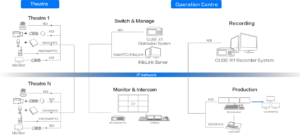


Now you’ve purchased an awesome P series 4G bonding encoder from Kiloview, you’re going to want to match it with the Kilolink Bondling Platform so that the device can transmit video signals stable and fast within the internet. This article provides an overview of how you deploy the server and how to add the P series to the KiloLink and check the bonding status, and what you need to do in order to get your server ready for work. And the whole passage will be divided into three parts:
- Preparations before the deployment of the Kilolink Bonding Platform
- Kilolink Deployment Procedure
- Connection of P and Kilolink
Preparations for an environment to facilitate the deployment of the Kilolink Bonding Platform
(1)Hardware
Processor: Intel Core i3 CPU or higher
Hard disk: 64G hard disk or higher
RAM: 4GB RAM or higher
(2)Software
Operating system: Linux64-bit operating system(Ubuntu 18.04+ / Debian 9+)
(3)Network
IP address: one public IP address
Bandwidth: related to the video encoding rate, e.g.: encoding rate 4Mbps, bandwidth will be 8Mbps.
Port: The server needs to use the following ports. If there is a firewall in the server’s network, the related ports need to be opened. Therefore, please make sure below ports are open.
| Ports | Protocols |
| 81 | TCP |
| 3478 | TCP+UDP |
| 60000 | UDP |
| 60001 | UDP |
| 5000-5100 | TCP+UDP |
| 30000-30050 | TCP+UDP |
Note:
- Due to the hardware and maintenance costs of the server, as well as the version update of the cloud platform, it is recommended to rent the cloud-based server such as AWS server.
- KiloLink Server will use many ports. If there is a firewall during deployment, the related ports need to be opened in the firewall. Kiloview uses AES256 encryption to ensure security during live streaming.
- Server
Login to the server by remote terminal software, Xshell and PuTTy are recommended.
(1)) Download link of Xshell:https://www.netsarang.com/zh/xshell-download
Download link of PuTTy:https://www.chiark.greenend.org.uk/~sgtatham/putty/latest.html
(2) After downloading and installing, enter the server IP address in the new session, and chooses “SSH” protocol. The port number is 22 by default. Click “OK” when finished.
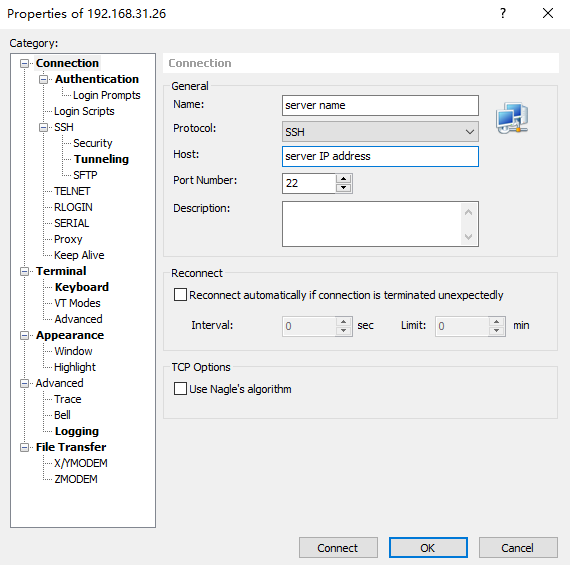
sudo su –
2.1 Deployment steps
- If your server has not deployed the KiloLink bonding platform, please start from Step Third, otherwise please follow the below steps to reset the server and enter the following commands in the terminal:
First Stop all dockers:docker stop $(docker ps -aq)
Second Delete all dockers:docker rm $(docker ps -aq)
Third Delete all images:docker rmi $(docker images -q)
Fourth Delete the existing data directory:rm -rf /data
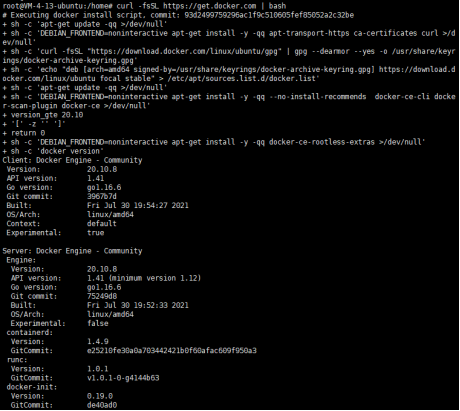
(2) Install docker and enter the command in the terminal window:
curl -fsSL https://get.docker.com | bash
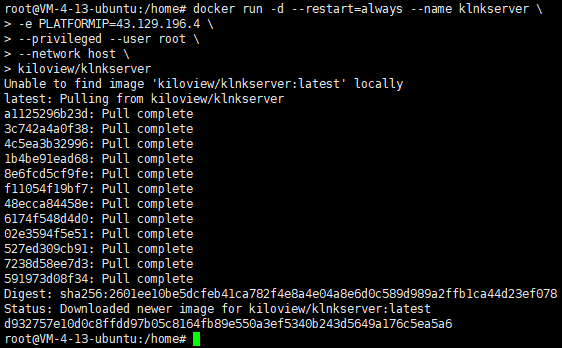
mkdir /data

docker run -d –restart=always –name klnkserver \
-e PLATFORMIP=43.129.196.4 \
–privileged –user root \
–network host \
kiloview/klnkserver
Note
PLATFORMIP is the public IP of the server, please configure it according to your actual situation.
2.2 Login verification
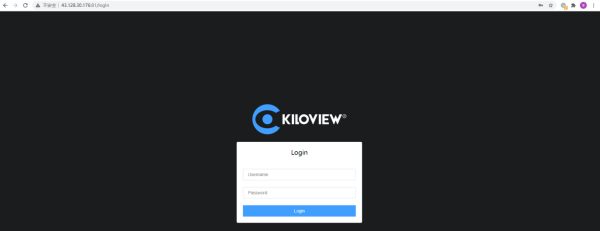
Enter “Server IP address: 81 “ in the browser (Google is recommended) to enter the login webpage of the bonding platform. The username and the password both are admin by default.
Note
- The default port number for server login has been adjusted to 81
- P series bonding encoders need to be updated to version 4.7.2517
- The port number of the device is still 60000
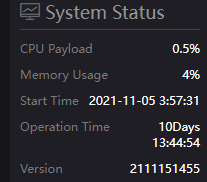
- Check the version information after login
3. Add P series 4G bonding encoder to the KiloLink Bonding Platform
3.1 Login the bonding platform
Enter http://server IP: 81/ in the browser to login to the bonding platform. The default username is admin, and the password is admin.
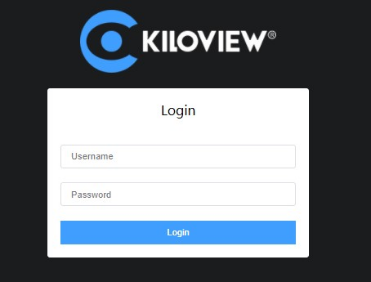
To ensure information security, we recommend you change the password immediately after your first login.
The default port of the server login is 81.
3.2 Device connection
Step 1: Add the device to the platform and generate an authorization code.
Click “Device management”-“Add device”,configure the parameters and generate an authorization code.
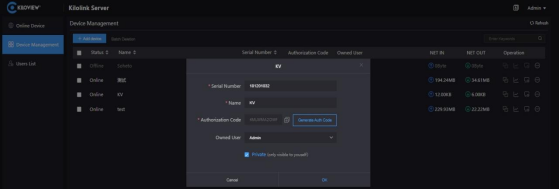
Introductions:
- Serial Number: Login to the device Web page to get the Serial Number in the lower left corner of “System Information”, which consists of 9 figures.
- Name: Any combinations of alphabets, numbers and symbols.
- Authorization Code: Click “Generate Auth Code”, then an authorization code combining with letters and numbers will be generated automatically, which will be used for device registration.
- Owned User: The added devices can be visible to a certain user you assigned. All devices will be displayed under the management account.
- Private: After selected private, the added device will only be visible to yourself and the management account (admin).
Step 2: Device registration
Login to the device Web page, click “Network & Service Settings” – “Connect Bonding Server”, and configure the parameters to start the bonding service.
Introductions:
Please make sure that your device firmware and the KiloLink Server have been updated to the latest version.
To download the latest firmware, please visit our website: https://www.kiloview.com/en/support/download/, select “Video Encoder”> “P1/P2”, and click “Firmware” to get the latest firmware download.
For the latest KiloLink Server version, please refer to:https://www.kiloview.com/en/support/docs/p2/4g_aggregation/
- Server address: The IP address of the bonding server, which support domain names.
- Port: The port that used to login to the Web page of the bonding server. The default port is 60000.
- Auth Code: Generated when adding the device to the bonding platform.
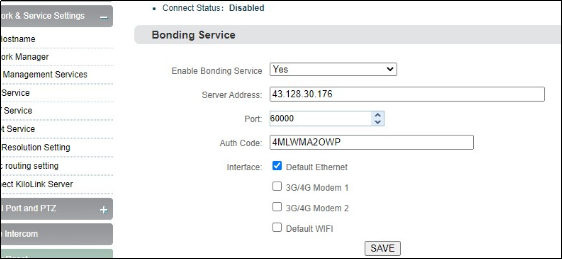
There are four default options of bonding ports: Default WIFI, 3G/4G Modem 1, 3G/4G Modem 2 and Default Ethernet. When inserting 4G USB modems, there are two modes: one is “MODEM” mode, the other is “ETHERNET CARD” mode. In the MODEM mode, it will be recognized as 3G/4G Modem 3 or 3G/4G Modem 4. In the ETHERNET CARD mode, it will be recognized as USB network connection 1 or USB network connection 2. And the options will be increased in the port.
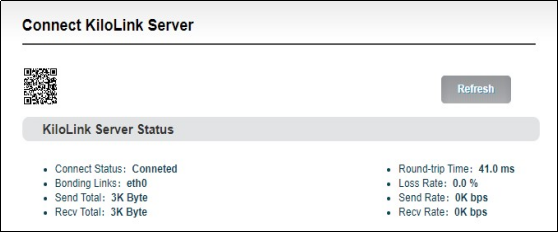
If it shows “Connected” in the bonding status, which means that the device has successfully registered to the bonding server and you can use the aggregated links for streaming. And you can log into the bonding platform through the QR code in the upper left corner to disable and configure the parameters.
Introductions:
⚫ Bonding links will display all selected bonding network links
⚫ Sending statistics means you can calculate the data transmitted by each network link
⚫ Round-trip time is designed to indicate the round-trip time at both ends of each network link. The longer the time, the higher the delay after aggregation.
⚫ Packet loss rate: The packet loss of each network link. When the packet loss rate is too high, it may cause such abnormalities as unsmooth video transmission.
⚫ Transmission rate: The transmission rate of each network link. The total rate is equal to the actual configured encoding rate.
Topics that you may be interested in:
Kiloview 4G bonding encoder https://www.kiloview.com/en/encoder/4g-bonding-encoder/
Kilolink bonding platform:https://www.kiloview.com/en/kilolink/
10 Most Popular Q&A About Server Deployment of the Kiloview Kilolink
Anything else you want to know, you can also write to [email protected]