
Audio encoding parameter setting
Encoders can set audio encoding parameters. Click “Encoding &stream”, pull downward “Audio Encoding Engine”, then entering into audio parameters setting. Audio encoding channel is forced to enable. Audio encoding modes include AAC and G.711, optional. Audio sampling is chosen according to actual situation. Channels consist of “Stereo” and “Mono”. Encoding bitrate is adjustable between16K-256K, default is 64Kbps. One more detail: if encoder using TS-UDP protocol or needs using recording, then it needs to choose “With ADTS header” under AAC format.
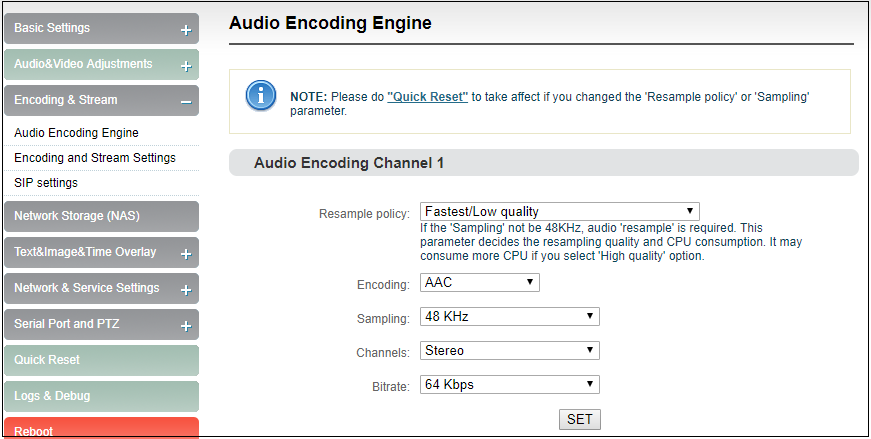
Note: Please do "Quick Reset" to take affect if you changed the ‘Resample policy’ or ‘Sampling’ parameter.
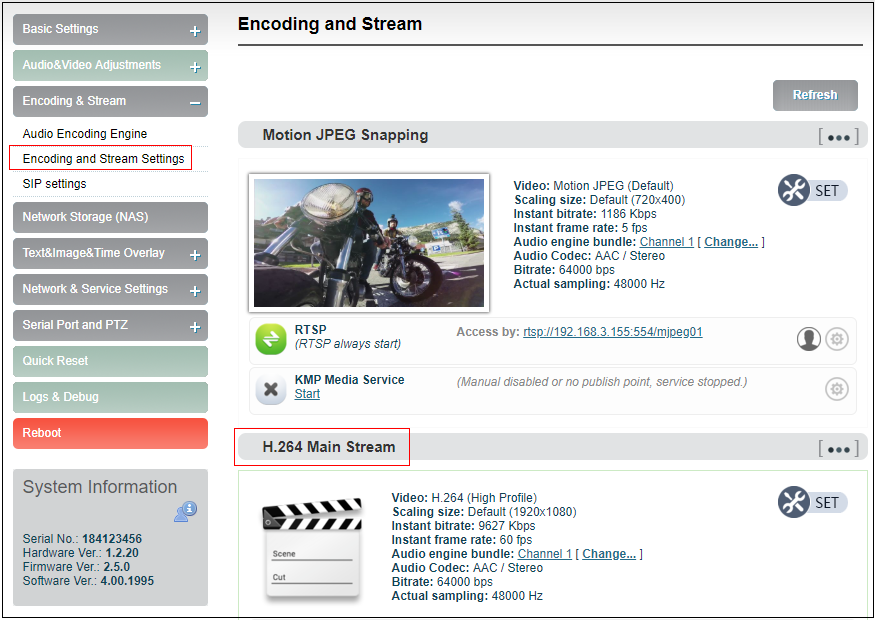
Encoding and stream settings
Video encoding parameters are adjustable. Click “Encoding &Stream”, pull downward “Encoding and stream settings” to enter below interface. We generally set parameters of “H.264 main stream”, click “Setting”.
Note: It is H.264 Main stream, the second setting, not Motion JPEG setting.
Note: For NDI, the sub-stream of the encoder must always be in the running state, otherwise it may cause the NDI stream to have no audio.
Click SET, entering into below interface for main streaming encoding parameters setting, as follows:
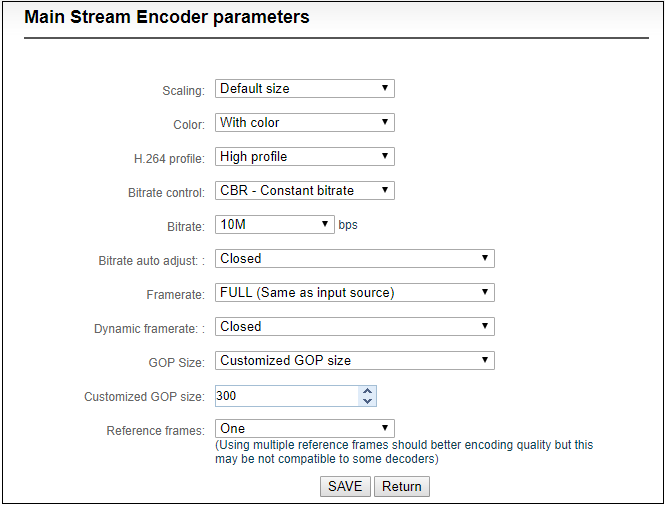
“Scaling” has 9 options for choice. Default setting is “Default size”, that is, the video size after encoding is the same as the input video size.
“Color” has two options: “With color and monochrome”. Monochrome is black and white color, “with color” remains the original color. Default setting is “With color”.
“H.264 Profile” supports High profile,main profile,baseline, which is set according to platform supported encoding profile. High Profile is the highest compression efficiency, that is, under the same bitrates, image quality is the best; Baseline is the most widely supported; default setting is High Profile.
“Bitrate control” has two ways: CBR-Constant bitrate and VBR-Variant bitrate. From literal meaning, CBR is stable and unchanged bitrate, while VBR is constantly changing according to actual content. Generally, network transmission adopts CBR to guarantee transmission quality, while file storage uses VBR to guarantee file quality. Default setting is CBR-Constant bitrate.
“Bitrate” supports adjustable 64K-25M. Users could choose default setting, or self-define bitrate size. The higher bitrates, video quality after encoding is better. But specific setting should be based on actual network situation, couldn’t be higher than your own upstream bandwidth.
“Framerate” has three options: FULL (same as input source, HALF (half when source framerate>=50 and customized framerate. “FULL” means framerate after encoding is the same as the framerate of input source; “HALF” means if input video is 1920*1080P50, video framerate after encoding will be 25. This will be a good saving on the consumption of network bandwidth; customized framerate is user assigning framerate after encoding, in theory, it shouldn’t be higher than original framerate.
“GOP size” has five options and supports user-defined adjustment. It is adjustable according to actual situation, default is 60, and normally it could meet the most majority of needs.
“Reference frames” has two options: one and multiframes. Theoretically using multiframes can improve encoding quality, but some decoders and players may not support multiframes.
Substream parameter setting refers to Main stream configuration
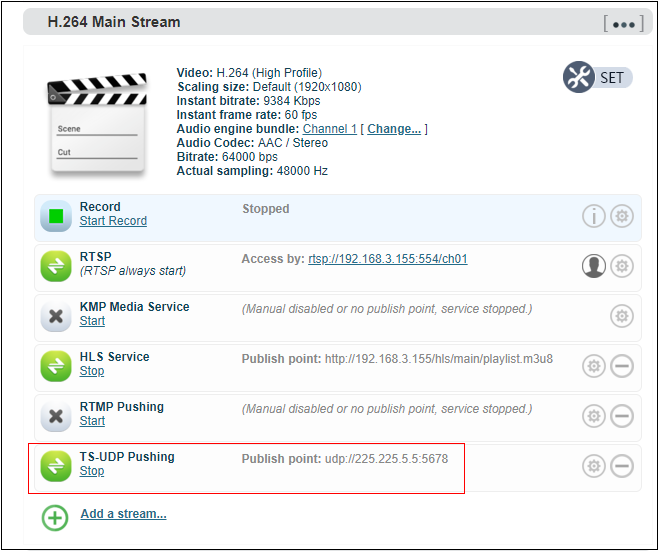
Streaming media service
E series NDI encoder currently support streaming services include: NDI stream, RTMP push, TS-UDP push,HLS service, SRT service (not support RTSP pull stream currently).
One code stream can run up to 8 stream services at the same time for the encoder, which means it can push the video stream to 8 different live platforms. There are two code streams (the main stream and sub stream) for the encoder, so the encoder can stream up to 16 different live platforms at the same time. In general, the main stream is enough, and the sub stream is mainly used in the security monitoring field to achieve the docking usage with the NVR.
Motion JPEG stream
Encoder has a Motion JPEG stream, it keeps running without stop. It is blank with blue color if without video access. If with a video signal access, Motion JPEG stream will display the content of current flow, “the video signal lock” displays locked and it will display the current video signal format.
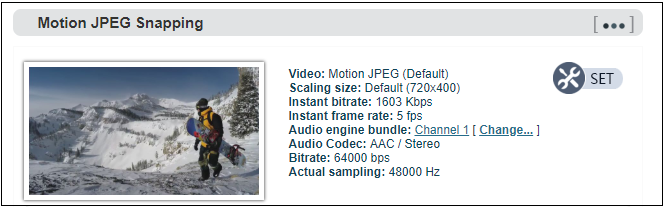
Note: Motion JPEG stream is a picture preview, refresh every 3 seconds, or click the mouse to refresh, so it is normal to see it is not fluent on the page.
RTMP Pushing (Live streaming)
Using RTMP pushing, the first thing is to make sure platform providing RTMP pushing address, otherwise our encoders couldn’t do RTMP pushing (Currently some live streaming APP couldn’t provide RTMP pushing address.)
Note: The principle of RTMP push stream is that it must be pushed from the encoder to the platform. The computer/decoder then pulls the RTMP stream from the platform for playback. The encoder cannot directly push the RTMP stream to the computer/decoder for playback.
YouTube live streaming
“Streaming point” is RTMP address given by platform (Take YouTube as an example). (Other platforms are similar, if any questions please contact platform technical support for help).
1)Login to YouTube, get below address:
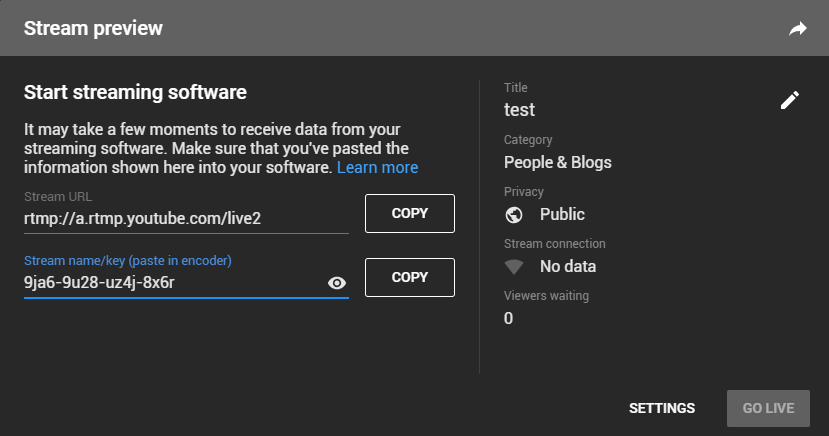
Streaming point should be like Server URL+Stream name/key,
for example: rtmp://a.rtmp.youtube.com/live2/9ja6-9u28-uz4j-8x6r
2) After you get the RTMP URL address, you need to set it up in the encoder.In the main stream of H.264, there is a stream service option to be added. By adding a RTMP push, you can get a RTMP push option. Click the settings button on the right side of the RTMP push, and you will enter the interface to fill in the RTMP push configuration. The push address on YouTube platform is filled in the "push point" , and set "Enable pushing" to "Yes". Click “Save”, then RTMP will stream to YouTube.

If the platform requires user name and password verification, you also need to fill in the corresponding parameters in the encoder.
3)On YouTube platform ,if the video can be displayed, the push stream is successful, otherwise you need to check the network and other configurations .
Note: In the case of RTMPS push mode, fill in rtmps URL at Push point and set ‘Use old RTMP version’ to yes, so that it can be supported.
TS-UDP Pushing (unicast and multicast)
Click  to select TS-UDP Pushing, then entering into TS-UDP setting interface.
TS-UDP pushing divides into unicast and multicast. If using unicast, “pushing target address” is device IP address of receiving TS streaming. “Target port” is any port, but it is better not conflicted with other service port. No need to change Multicast TTL; If using multicast, “pushing target address” needs to write a correct multicast address (224.x.x.x ~ 239.x.x.x). “Target port” is any port, but it is better not conflicted with other service port.
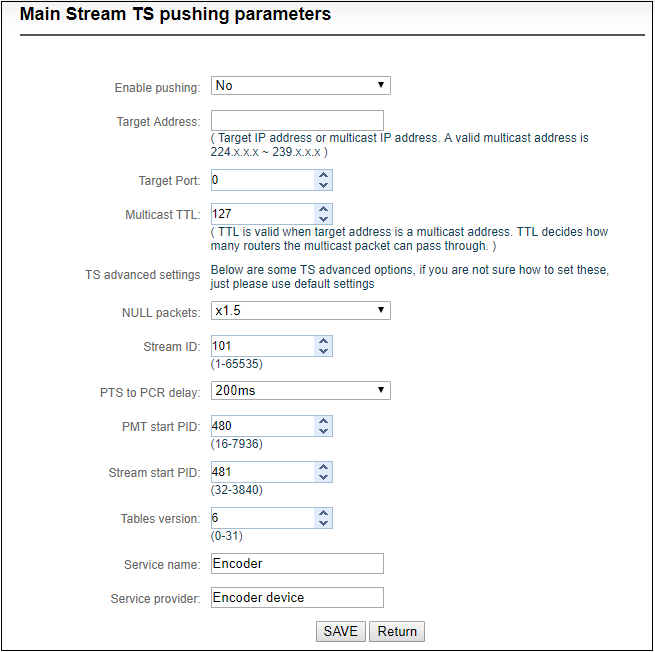
After finishing setting, it will come up an URL address from TS-UDP pushing, which could be decoded through VLC or other decoding player. If it is multicast, please remember to close Windows firewall.
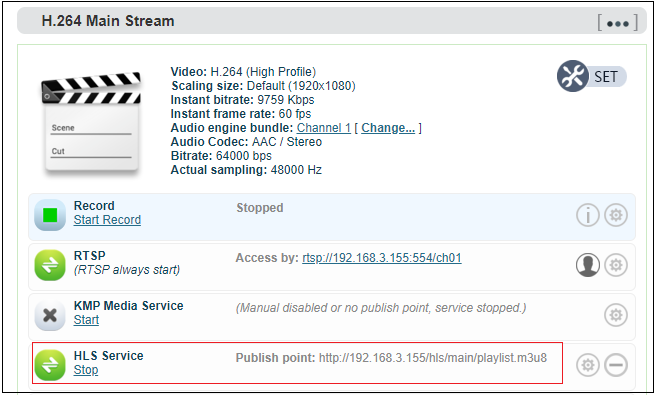
HLS service
Using HLS service, the first thing is to “add a stream service”, then click right-side SET icon of “HLS service” for setting.
Below is setting interface of HLS service. Very simple, if no special requirements, no need setting, only enable service.
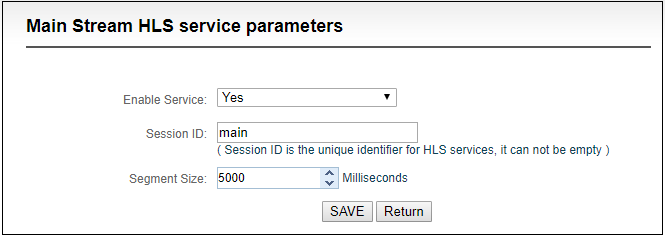
Once enabling service, it will get one HLS Publish point. You could watch it through VLC and other players using this address.
SRT service
Click “Encoding & Stream”–“Encoding and Stream Settings”–“H.264 main stream”–“Add a stream”. Choose “SRT-TS pushing”, click “OK” and add a SRT service.
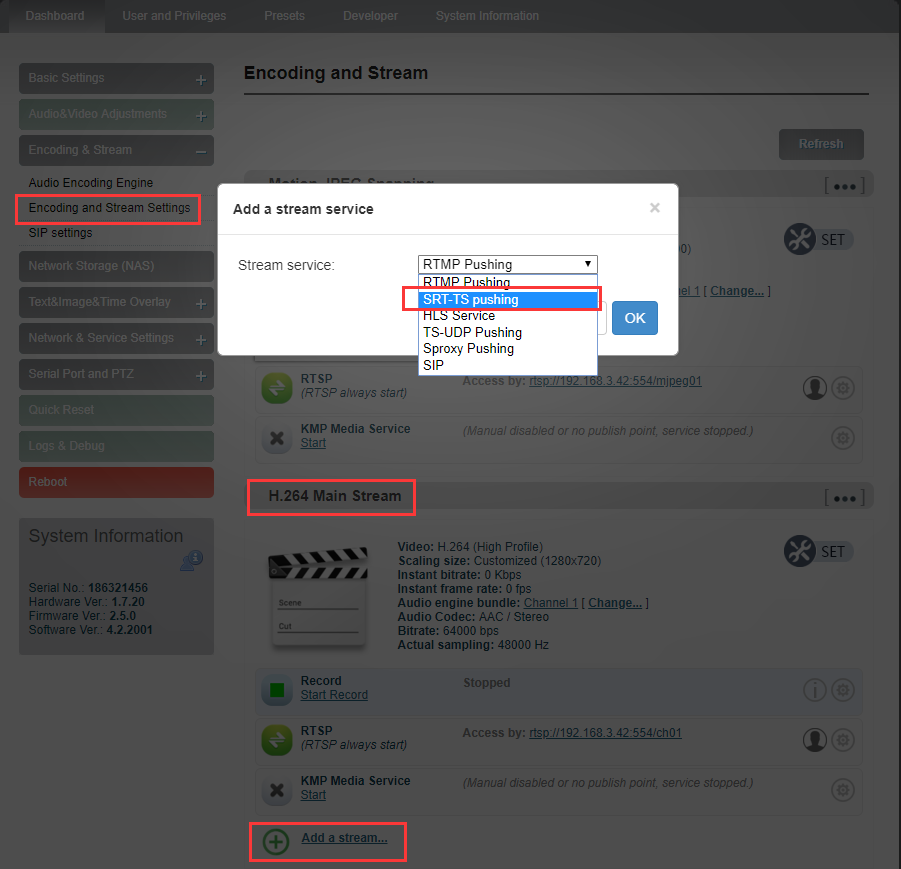
Click the icon  for SRT configuration.

Fill in the pushing address and port, click “Save”. Then SRT pushing is working.

Setting parameters means the following:
Open SRT service:yes or no;
Handshake mode: Caller、Listener、Rendezvous;
Address: Set IP address of the receiver;
Port: Set the listening port corresponding to thereceiver;
Transport delay: Set it based on the performance of the current network, the delay value can be set on both the SRT source device and the SRT target device. The final SRT transmission delay will be the larger one of the two values. Default is 125ms;
Advanced settings: Open and Close;
Encryption mode: AES-128, AES-192, AES-256;
AES key: Encryption key can be 10-32 letters or numbers combination;
Bandwidth overhead: It is set as the percentage value based on network link quality. Using this value to multiply the total bitrate of the audio and video encoded by the encoder, this will get the occupied maximum bandwidth allowed by Bandwidth Overhead. This value plus the total of video and audio bitrate is the threshold of the current SRT transmission bandwidth, and also the maximum bandwidth that SRT stream can be used. From the perspective of "overhead", it is the extra "invalid" bandwidth to be used in addition to the media content required for transmission (which can be understood as the payload), but it is different from our common protocol overhead, TCP header overhead, UDP header overhead. The bandwidth overhead here is not a fixed 20-60 bytes TCP header overhead or 8 bytes UDP header overhead. It changes in real time according to the network conditions. The worse the network link conditions are, the more overhead needs for normal transmission. The range is 5%-100%, and the default overhead is 25%;
Load size: Sending data packet size, it is optimal that the receiver should equip with the same size. The default size is 1316, which is the optimal packet for the encoder.
Note: Below format is the reference delay value under different packet loss. When RTT>20ms, it requires to increase the delay appropriately.
| Network highest packet loss rate (%) | RTT Multiplier | BW Overhead | The lowest SRT delay (when RTT≤20ms) |
|---|---|---|---|
| ≤1 | 3 | 33 | 60 |
| ≤3 | 4 | 25 | 80 |
| ≤7 | 5 | 20 | 100 |
| ≤10 | 6 | 17 | 120 |
Save the settings, then a SRT-TS pushing address will be added. The encoder starts to initiate a handshake connection to the receiver.