文章目录
Status column
In the status column, the left window is for preview of the video source either with image or video. When preview with image, you will see image stream, which refresh every 3 seconds. When preview with video, you will see smooth video. You can control and switch image stream and video stream through the switch button. If the preview window is displayed in black, it means the video source has not been detected by the device, and you need to check whether the input cable is plugged in correctly. The icon  and
and  in the lower left corner of the preview window can realize the functions of safety frame and center line for the preview video.

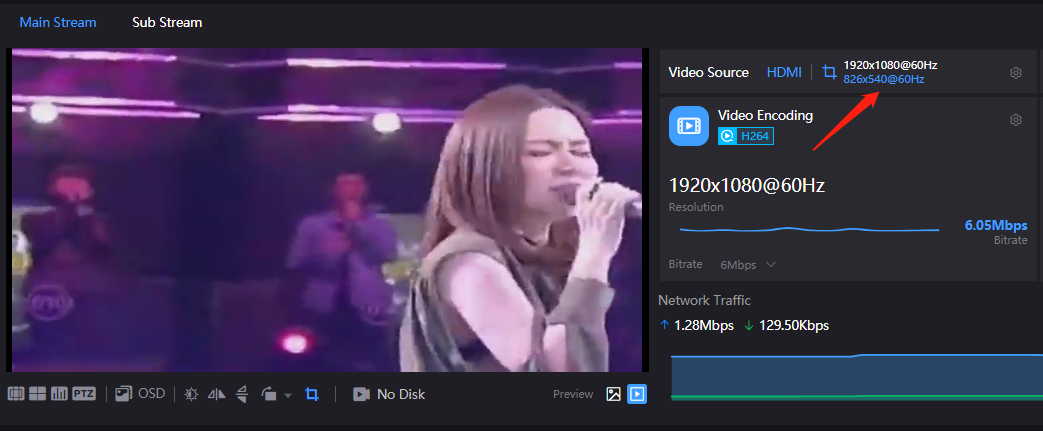
The parameters for main stream and sub stream are showed at the right window. You can switch the pages through clicking main stream and sub stream in the upper left corner. Brief introduction of the relevant encoding parameters as below:
Video source: Display the interface of the source
Encoding format: Display the encoding format of the source
Resolution: Display encoding resolution of the source
Real time bit-rate: Display real-time encoding bit-rate changes of signal source.
Network flow: Display the real-time consumption flow changes of signal.
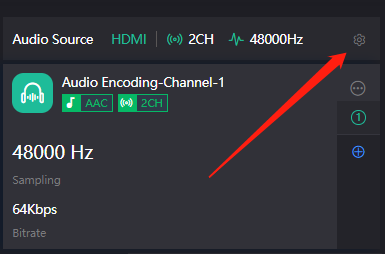
Audio source:Display audio format of the signal source
Memory usage: Status of content usage
Storage space: The usage status of internal storage space
CPU:The usage status of CPU
Audio and video encoding setting
Click setting button in the status column, enter to “audio and video encoding setting” interface.
Audio and video signal source setting
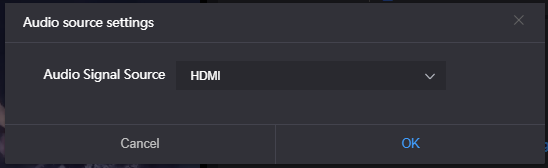
There is only one HDMI input for the device, video source defaults to HDMI. For audio source, you can select HDMI embedded audio or analog Line in. Default setting is HDMI embedded audio.
Video encoding parameter
Main streaming encoding parameters setting parameter as below:

Two ways of encoding mode, the main stream and sub stream can be selected as H264 or H265.
“Scaling” has 7 options for choice. Default setting is “Default size”, that is, the video size after encoding is the same as the input video size. You can also set to encode low resolution input into high resolution output, and similarity, high resolution input can be encoded into low resolution output.
“Color” has two options: “With color” and “monochrome”. Monochrome is black and white color, “with color” remains the original color. Default setting is “With color”.
“Profile” supports High profile, main profile, baseline, which is set according to platform supported encoding profile. High Profile is the highest compression efficiency, that is, under the same bit-rate, image quality is the best; Baseline is the most widely supported; default setting is High Profile, which should be based on the actual platform supported (Only one profile for H.265 encoding).
“Bit-rate control” has two ways: CBR (Constant bit-rate) and VBR (Variable Bit-rate). From literal meaning, CBR is stable and unchanged bit-rate, while VBR is constantly changing according to actual content. Generally, network transmission adopts CBR to guarantee transmission quality, while file storage uses VBR to guarantee file quality. Default setting is CBR-Constant bit-rate.
“Bit-rate” supports adjustable 20K-40M. You can select as we set or self-define bit rate. Theoretically, the higher bit-rates, video quality after encoding is better. But specific setting should be based on actual network situation, and couldn’t be higher than your own upstream bandwidth.
“Framerate” support adjustable from 1FPS to 60FPS and customized framerate, customized framerate is user assigning framerate manually after encoding, in theory, it shouldn’t be higher than original framerate.
“GOP size” has seven options and supports user-defined adjustment. GOP(Group of Pictures)is a group of consecutive picture, the strategy of GOP affects encoding quality. It is adjustable according to actual situation, default is 60, and normally it could meet the most majority of needs.
Audio encoding parameter
Audio encoding modes include AAC and G.711 for choice. Audio sampling is chosen according to actual situation. Audio channels consist of “Stereo” and “Mono”. Encoding bit-rate is adjustable between16K-512K, default is 64Kbps.
The input channel supports 4 audio channels input. You can select two channels for encoding output and add, delete, modify audio channels according to your needs. Each pair audio channel can be set as different encoding mode, sampling and mapping relationship between input channel.
1)You had better to create 4 audio channels, click “+”and new audio channel created.
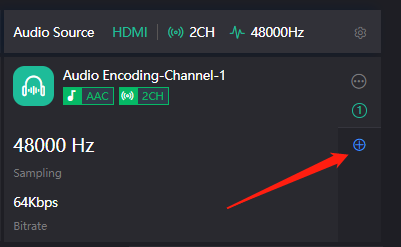
2)Set audio name, encoding mode, sampling and mapping relationship between input channels.

3)After setting completed, you can select corresponding audio channel for encoding when creating streaming service.

Text and OSD overlay
Text overlay
1)Enter “ OSD”—“Image management”—“Add image”.

2)Fill in “image ID in the pop up window, choose the image to upload, and then save. You can check the image and information listed under the Image list.
Fill in name in the pop-up window, select the image to upload, and then save. The image uploaded successfully will be listed under the image list.
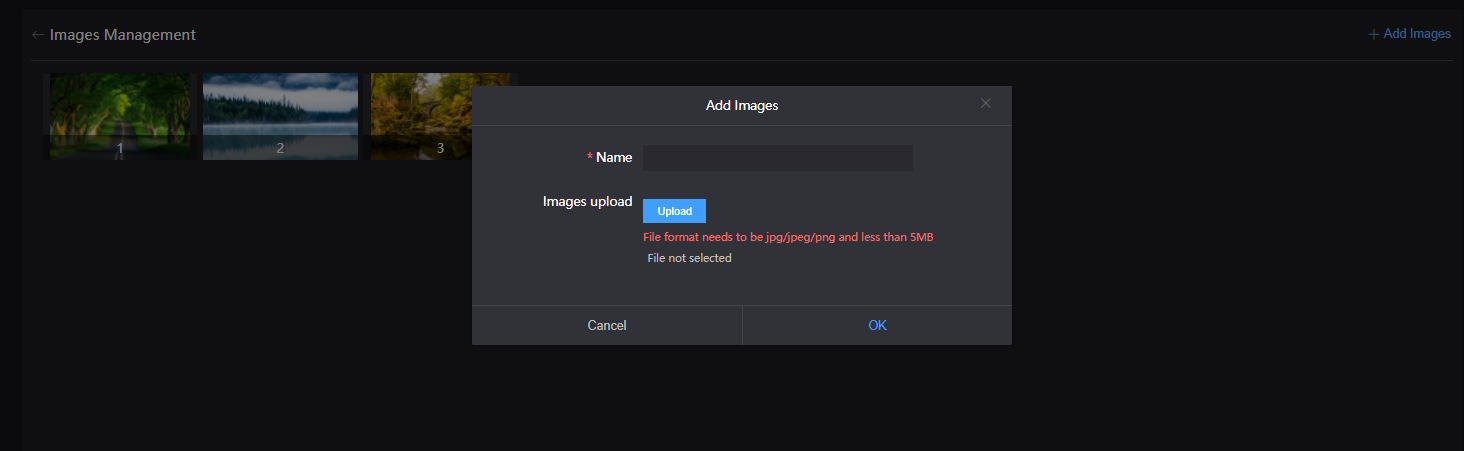
3)Click image management back to image overlay page, click add image.

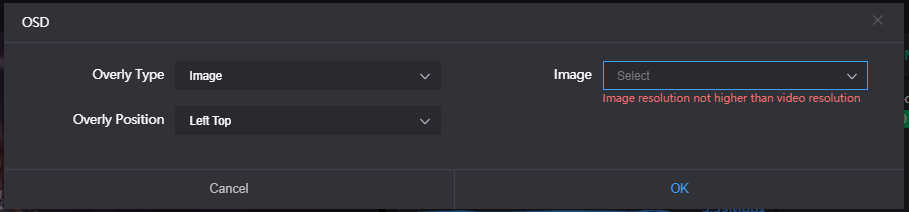
4)Go to the overlay setting pages, select image in the overlay type, and then click the image and the position you need overlay, click “Ok”.
5)The configured image overlay will be shown at the station column, check the image overlaid, and finally check image overlay to make it effect.

Note: Due to the limits of storage space, up to 10 images can be uploaded, and the maximum size of a single image is 5M. The resolution of uploaded image cannot be over the video. For the image format, only JPEG and PNG supported. You couldn’t see the effects of image and text overlay in the preview window, which can be displayed on the computer by decoding output with software or decoder.
OSD overlay
1)Click“OSD”-“text overlay”-“add”.

2)Go to the configuration page, to choose overlay item to set overlay functions for “Image”, “Time and Date” and “Text” respectively.
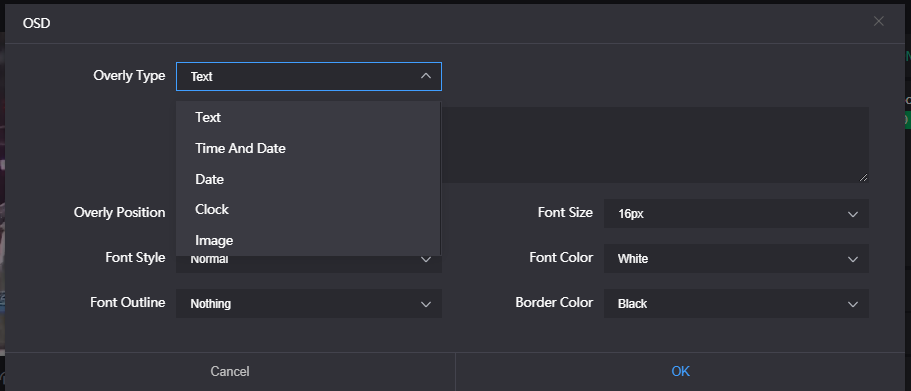
Overlay type: “Text, Date, Time, Date/Time, and Image” for options.
Overlay position: there are seven preset display and self-defined positions for optional, which should be based on your actual needs for selection.
Horizontal position: when the overlay position is customized, adjust the character offset based on the horizontal offset setting.
Vertical position: when the overlay position is customized, adjust the character offset based on the vertical offset setting.
Font size:Three auto sizes for options. “Auto Large font”, “Auto Medium” and “Auto Small”. Adjustment from 9px to 96px also supported.
Font style: Normal or Bold.
Font outline: Nothing, or thickness for optional.
Font color: Text color for optional.
Bonder color: Text frame color for optional.
Color adjustment
1)Click color adjustment icon in the information bar page.

2)Open the color adjustment page, the system default of brightness, contrast, and saturation are all 128. Users can adjust it according to the image requirements and set the value from 0 to 255 for improving effect.

Image and rotation
Horizontal mirror
After clicked the horizontal mirror icon, the left and right parts of the image can be mirrored and swapped with the vertical central axis of the image as the center.

Vertical flip
After clicked vertical flip icon, the upper and lower parts of the image can be mirrored and swapped with the horizontal central axis of the image as the center.

Flip
Click spin button, you can clockwise rotate the video with 90/180/270 degrees.
Video cropping
Video source image cropping: crop a part of the original video and send it for encoding.
1) Click cropping icon in the information bar page.

2.Enter the configuration page, select the video source, click the image crop-turn on, adjust the width and height of the image, etc.
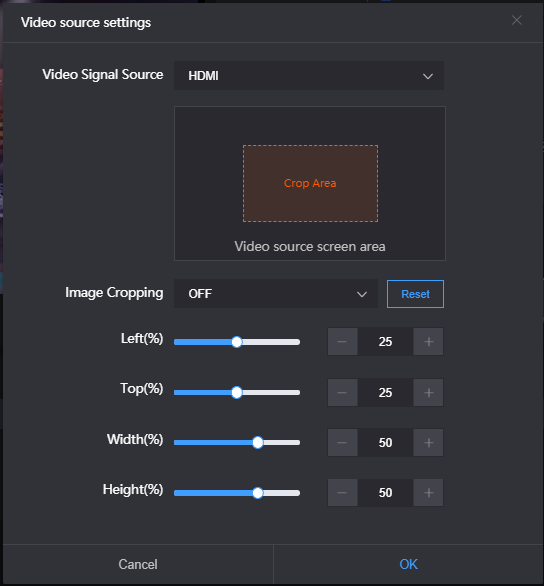
The orange area is the encoded image sent after the cropping completed. After finishing the clipping settings, the preview will be updated to show the encoded image after clipping.
3.After cropping is completed, it will be encoded according to the specific length and width pixels, and the resolution will not be changed after cropping.
Serial port and PTZ
USB xpansion port
With USB to RS232/RS422/RS485 adaptor (cable), after connecting to USB port, if the device and identify the serial port correctly, USB port will be listed at “Device”, then you can set the corresponding serial port parameters.
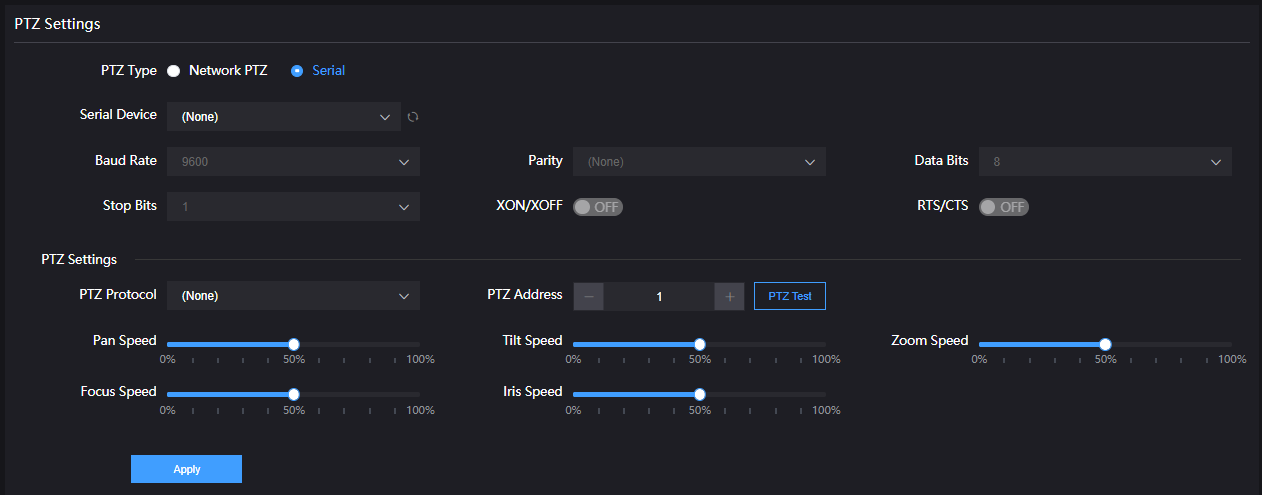
Note: The encoder can automatically identify the USB serial port conversion device of universal USB to Serial/FDTI chip/PL2303 chip. If the USB to RS232/RS422/RS485 converter (cable) you inserted cannot be recognized and the converter chip is not supported by default, please replace the serial cable.
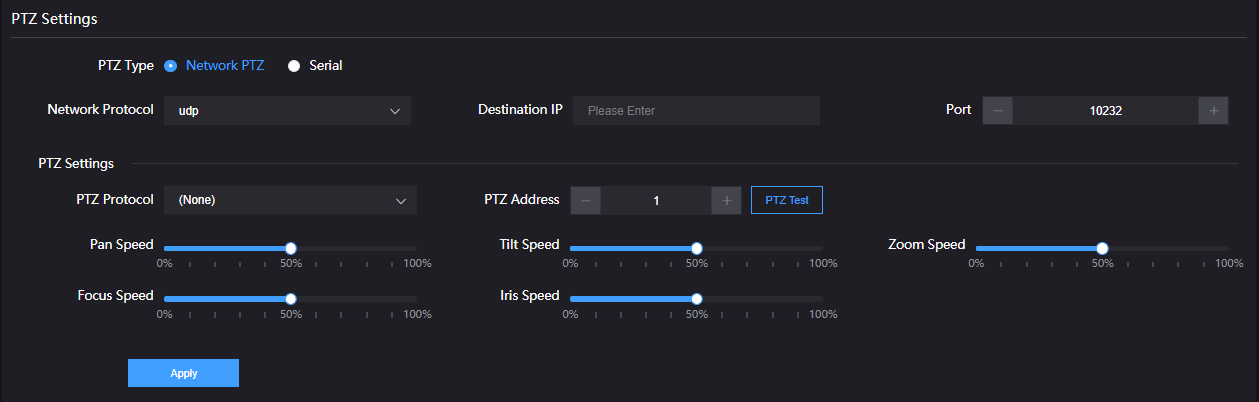
PTZ setting
The encoder can control the PTZ camera via Sony Visca, Pelco-D, Pelco-P protocols, you can also set the control speed.
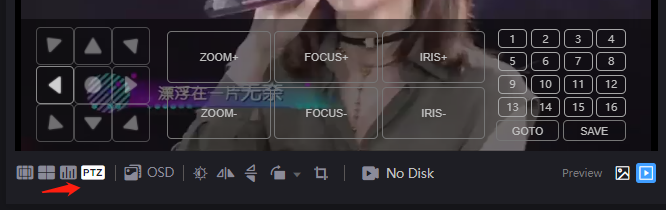
Control panel
Through the web page of the encoder, you can control the movement, zoom and focus of the camera in all directions.
Local recording
S2 encoder supports local recording function. Encoder with TF card-slot can support TF recording and meanwhile it supports USB disk inserted into USB port of encoder for recording. The recording operation is as follows:
1)Click “setting” in the Web UI, click “record management”, you can see that there are video parameter display and settings in the video management column. You can set the recording parameters, the recording is to record the main sub-bit rate at the same time, and the recording can also select the audio channel.
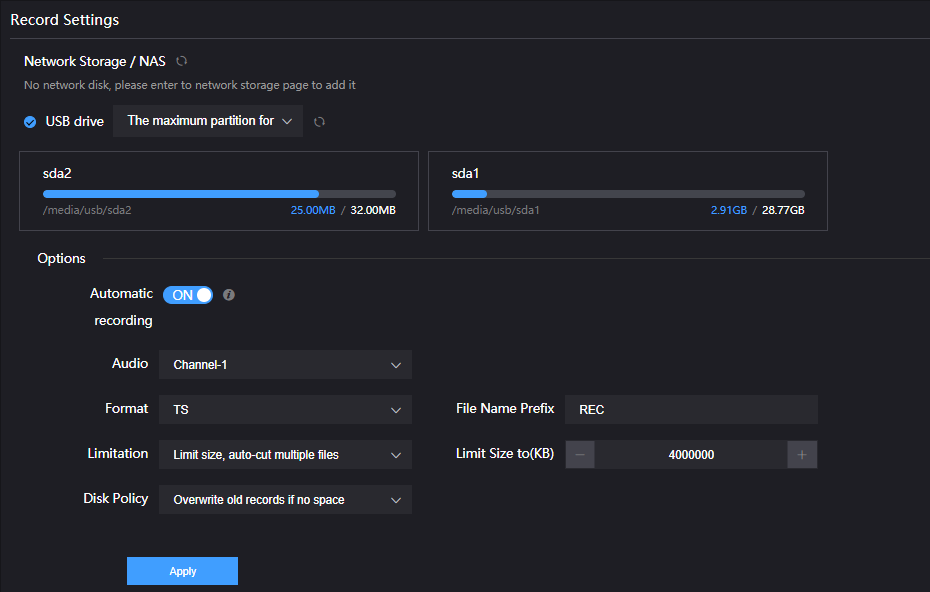
Note: A real challenge for recording by removable disks: If you remove the storage disk while recording, the recorded file may be wrong and cannot be played if the file format is ‘.avi’ or ‘.mp4’, etc. But ‘TS’ format can avoid this, also, the ‘TS’ format is compatible with almost all the main media players. If recording is performed in a non-TS format, when the recording is* *completed, stop the recording manually, and then remove the storage device to ensure the recording can be played normally.
2)By default, it automatically starts recording when storage disks inserted, regardless its storage type. It will record to the biggest available storage area. Recording format is TS file by default. Users could set recording for automatic cutting based on specified size. And when storage space is insufficient, it will automatically overwrite the old video file to achieve redundant storage.
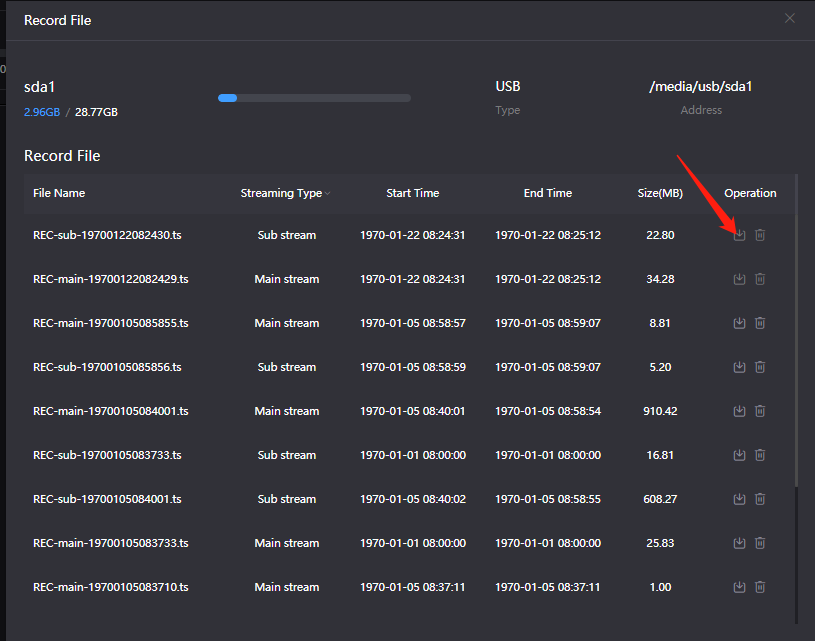
3)Click storage button, you can check recording status and record list.
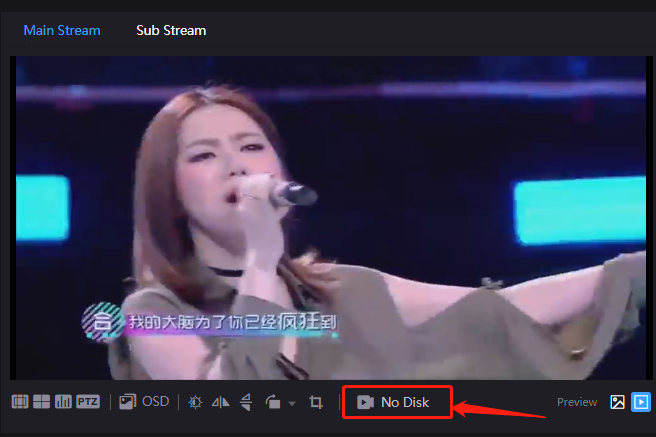
When no disks inserted or NAS network storage not set, the status will be as follows, dashboard will show “No Disk”.
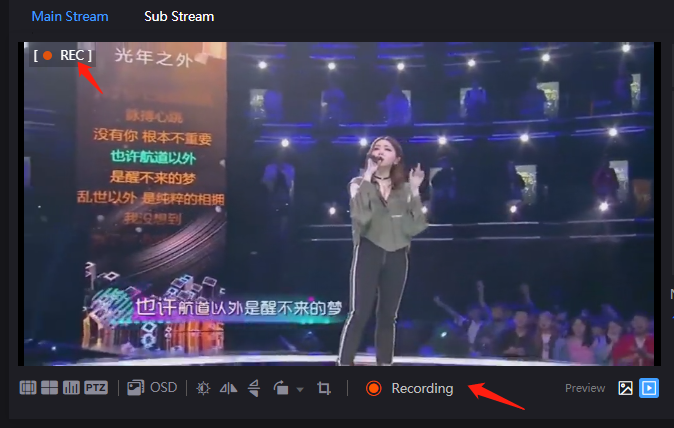
4)After inserted disks, the encoder will start recording automatically and the dashboard shows “Recording”. When it is recording, users can stop the recording manually and it can be restarted again.
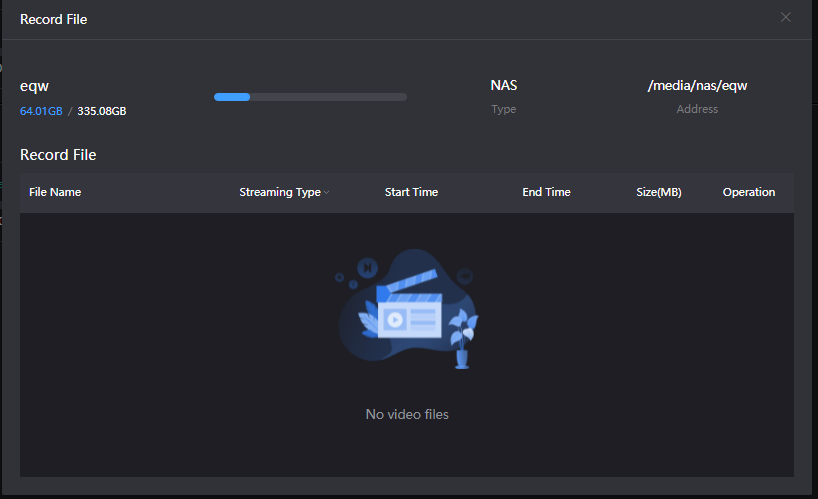
5)Click storage at the top. "Video Status" is shown below, where you can view the usage of the memory or download the video files that have been stored in the memory to the computer.
NAS storage
NAS is a Disk Arrays connected by network, which has all the main characteristics of disk arrays: high capacity, high efficiency and high reliability.
Open “NAS manager”, click “add NAS”, then fill in the corresponding parameters.
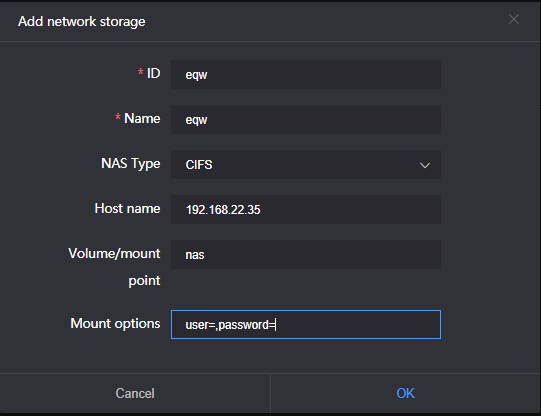
ID/ Name: Any Alphabet/number
NAS Type: NFS or CIFS (CIFS is a shared protocol for network connection, which requires high reliability of network transmission, TCP/IP is usually adopted; NFS is transport-independent, TCP or UDP is adopted. One of the disadvantages of NFS is, it requires the user to install a special software, while CIFS is integrated inside the OS, and no additional software is needed.)
Host: IP address of the Host
Volume/Mount point: Storage location on the host
Mount options: Settings about the user name and password. (Use half-width commas to separate the parameters)
NAS manager will show “Mounted”, if NAS connection has been established, and there is a RECORD file under the Mount point. If the connection is abnormal, it will be displayed as “Mounting”.

A recording folder will be created by default under the folder of the mount point of the network storage server: eqw, you can go to the folder to view the corresponding recording file.