

Table of Content
- Solution 1: OBS Studio (NDI Input, NDI Output, Virtual Camera Output)
- Solution 2: Streamlabs (NDI Input, Virtual Camera Output)
- Solution 3: Kiloview MultiView (NDI Input, NDI Output)
- More Solution: VLC + NDI5 (NDI Input, NDI Output)
- More Solution: vMix (NDI Input, NDI Output, Virtual Camera Output)
- More Solution: Hardware Media Gateway (Any Input, Any Output)
NDI is a good video protocol introduced by NewTek. To get an NDI video stream and output it again as a new NDI source (or use it as a virtual camera) using software, we have at least three free solutions: OBS Studio, Streamlabs OBS, Kiloview MultiView.

This article will introduce these three powerful NDI Apps and give detailed examples of relevant NDI settings. More solutions such as the newest NDI 5 tools, vMix, and hardware media gateway are also listed below.
Solution 1: OBS Studio (NDI Input, NDI Output, Virtual Camera Output)
OBS Studio is an open-source and well-known streaming software among video users. People often use it to create streams with screen/window capture or media files. Moreover, OBS is good at processing NDI too.
How to enable NDI input in OBS (to get an NDI stream)?
Here are the steps:
1. Install the obs-ndi plugin to enable NDI in OBS. You can Google “OBS NDI plugin” or click here to download the plugin installer for your platform.
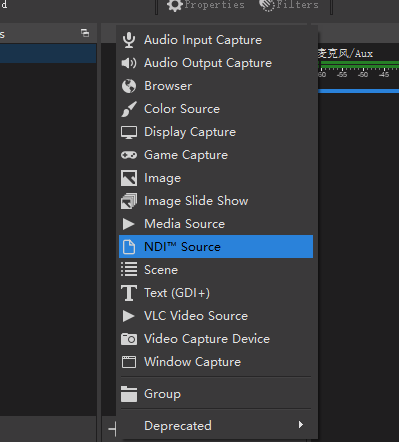
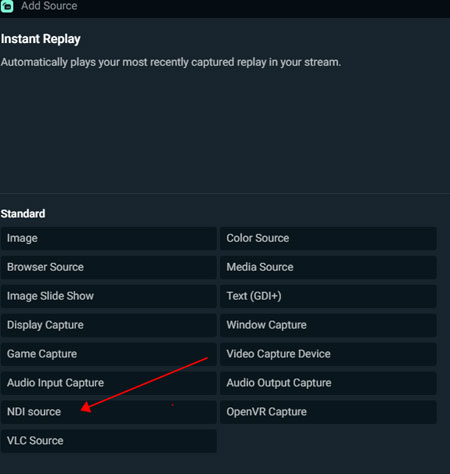
2. Restart your computer, and open OBS again. You will see the new “NDI Source” option when adding a new source:
Note, if you don’t have the official NDI tools package installed, your computer will automatically install NDI runtime dependency for the obs-ndi plugin.
Don’t have even one NDI source for a test? Try the “Screen Capture” or “Test Pattern” in the official NDI tools.
How to enable NDI output in OBS (to output as an NDI stream again)?
Sometimes, you use OBS to process your NDI video stream (image overlay, crop size, mix audio, etc.). After that, you may need to re-send it as an NDI signal again to the streamer or production system.
Here are the steps to output the NDI stream in OBS:
1. Install the obs-ndi plugin to enable NDI in OBS. You can Google “OBS NDI plugin” or click here to download the plugin installer for your platform.
2. Reopen OBS, and go to “Tools” -> “NDI Output Settings”. If you can’t find it, restart your computer or reinstall the ndi-obs plugin.
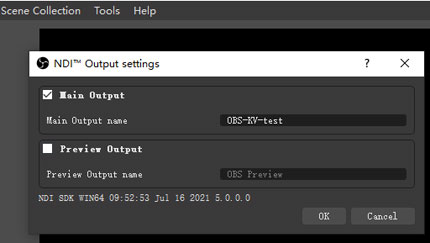
3. Tick “Main Output” and set a channel name for it (optional):
4. Prepare your NDI source to test. For example, you can grab a test image in the preview interface to see it clearly.
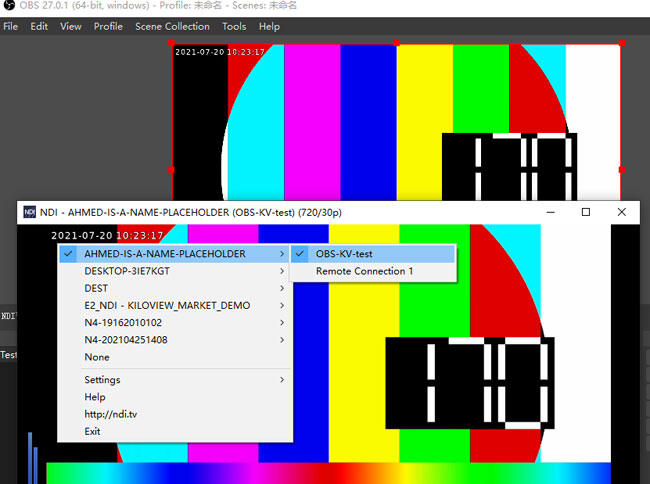
5. Open another NDI detector (we suggest the free Studio Monitor from NDI tools). You can see the OBS channel under your computer name and view it:
For now, you get assured that your video comes out from OBS as NDI again.
How to enable NDI virtual camera output in OBS (export any video as a virtual webcam in Skype, Zoom, Meet, or Teams)?
Sharing your computer screen, an interesting movie, or any specific App in a video call is useful: you can collaborate with your workmate or enjoy with your friends easily.
To do this, you can use an NDI virtual camera in a chatting app. Just follow the steps:
1. Open OBS, and prepare any media source you want to share. It can be an NDI video, or screen capture, video file, or overlayed resources.
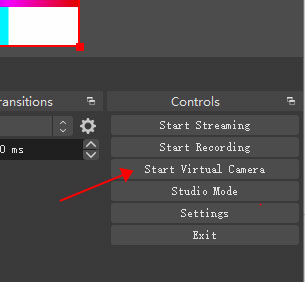
2. Click the “Start Virtual Camera” button on the “Controls” panel. If you can’t see the option, check if you are using the newest version.
3. Open your IM App, go to settings. In this case, we use Skype, for example.
4. Go to the “Calling” panel, select “Allow NDI usage”. In other Apps, you don’t need this step.
5. Go to the “Audio & Video” panel, and select “OBS Virtual Camera” for camera source. Don’t confuse it with the “OBS-Camera” option, which is for another use (we will explain later).
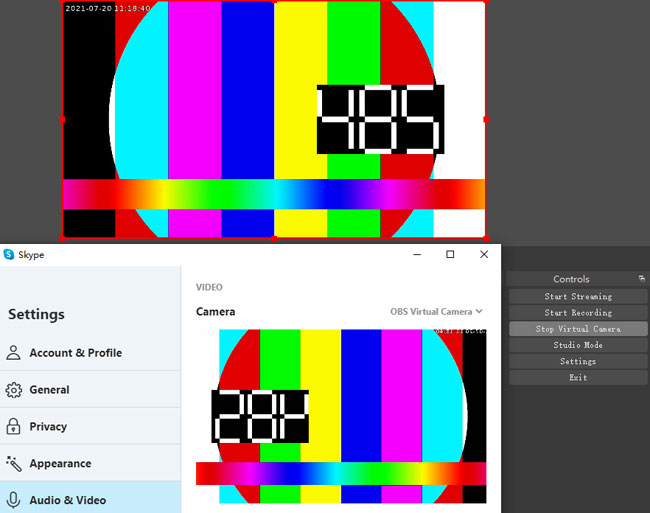
Now you can see Skype is taking OBS virtual output as your camera source. You can call your partner and test your video or adjust effects like background or mirrored video.
Solution 2: Streamlabs (NDI Input, Virtual Camera Output)
Similar to OBS Studio, Streamlabs OBS (also called SLOBS) is another free streaming App that supports NDI. You can use it to deal with NDI sources directly because it has NDI properties built in.
How to enable NDI input in Streamlabs OBS (to get NDI stream)?
1. Install NewTek NDI tools.
2. Start the software, find the “Sources” panel at the middle bottom, and add a new one.
3. Select “NDI source” in the pop-up menu. Unlike OBS Studio, Streamlabs doesn’t need an extra plugin to recognize NDI.
4. Choose an NDI source from the automatically detected list. If you don’t have any NDI source to test, try the free NDI tools or OBS NDI output.
How to enable NDI output in Streamlabs OBS (to output as an NDI stream again)?
Unfortunately, Streamlabs OBS does not support direct NDI output. If you want this function, try another Solution instead.
How to enable NDI virtual camera output in Streamlabs OBS (export any video as a virtual webcam in Skype, Zoom, Meet, or Teams)?
The steps are similar to OBS Studio:
1. Open Streamlabs OBS, and prepare any media source you want to share. It can be an NDI video, or screen capture, video file, or overlayed resources.
2. Go to “Settings” -> “Virtual Webcam”, and click the button “Start Virtual Webcam”. If you can’t see the option, check if you are using the newest version.
3. Open your IM App, go to settings. In this case, we use Microsoft Teams, for example.
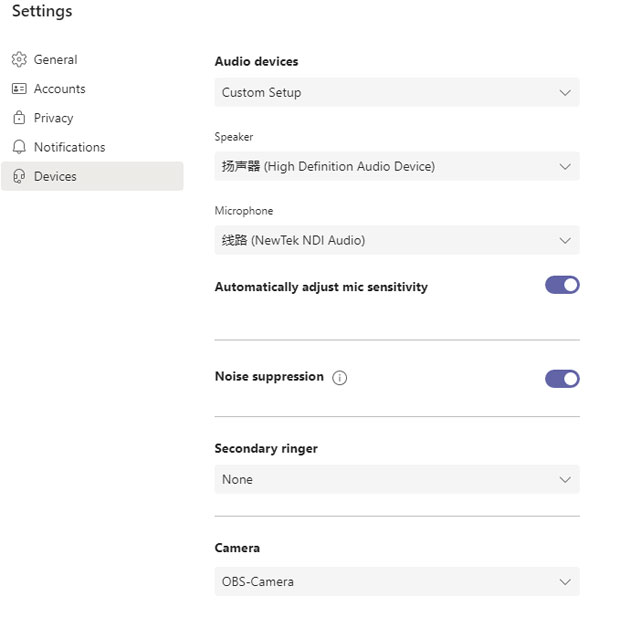
4. Go to the “Devices” panel, and select “OBS-Camera” in the “Camera” option. Don’t confuse it with the “OBS Virtual Camera” option, which is for the OBS Studio.
5. Join a Conversation, and adjust your audio device or video effect. Now your team member can see your Streamlabs NDI video instead of a real webcam.
Solution 3: Kiloview MultiView (NDI Input, NDI Output)
Kiloview MultiView is a free and professional NDI viewer for video producers. It supports up to 16 windows multi-channel NDI source auto-detecting and simultaneously viewing.
You can use it to batch view your NDI sources, monitor them in real-time, and output the videos as a merged NDI stream.
How to enable NDI input in Kiloview MultiView (to get an NDI stream)?
Here are the steps:
1. Download the free NDI player software from Kiloview’s website here. After installation, run it and finish the registration for free use.
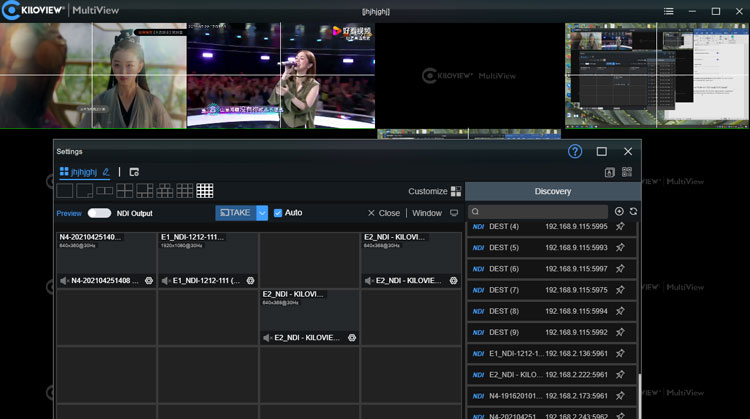
2. Click the menu bar on the upper right to open settings.
3. In the settings window, select a preferred layout. It supports 1-16 split-screen displays.
4. Drag the auto-discovered NDI source from the right side to the preview block. After that, you will see a real-time preview in the main interface.
If you don’t have any NDI source to test, try the free NDI tools or OBS NDI output.
5. Preview your NDI stream in multi-window and try more effects like a center cross. You can find the options in the left bottom.
How to enable NDI output in Kiloview MultiView (to output as an NDI stream again)?
It is easy to output NDI streams using Kiloview MultiView. The steps are:
1. Open MultiView, prepare some videos in the preview (monitoring) interface.
2. On the settings window, toggle the “NDI output” from the “Preview” mode. When you do this, a new QR code and a web control URL will appear. You can use either of them to control the outputting stream in your phone or any device of the same network.
3. Open another NDI viewer (such as Studio Monitor or OBS) to test. Create an NDI source and select the output channel you just created, and you will see it. The channel is under your computer name.
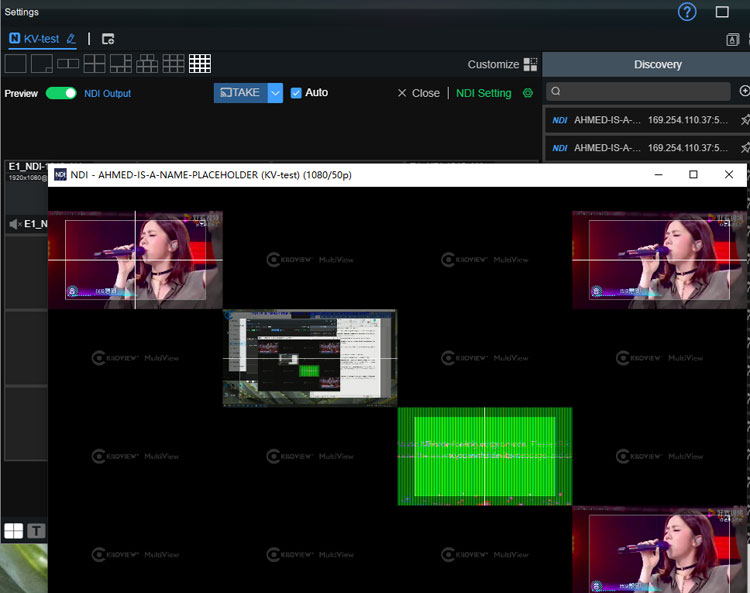
4. Scan the QR code of open the web GUI of step 2 to adjust your output NDI stream. You can drag more videos, replace positions, change video settings (resolutions, fps, etc.), add effects, and do more.
5. Open another NDI detector (we suggest the free Studio Monitor from NDI tools). You can see the MultiView channel under your computer name and view it:
How to enable NDI virtual camera output in Kiloview MultiView (export any video as a virtual webcam in Skype, Zoom, Meet, or Teams)?
With Kiloview MultiView, you can even show your NDI masterpiece to anyone in the world by virtual camera video calling.
The steps are:
1. Open MultiView, prepare some videos in the preview (monitoring) interface.
2. On the settings window, toggle the “NDI output” from the “Preview” mode. When you do this, a new QR code and a web control URL will appear. You can use either of them to control the outputting stream in your phone or any device of the same network.
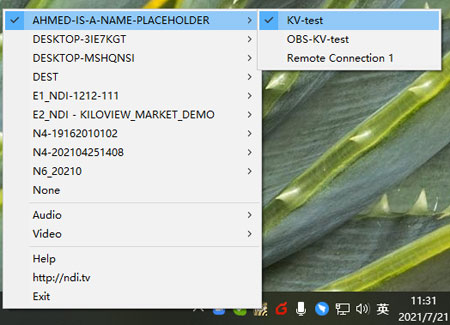
3. Open Webcam Input from NDI tools. You can download the NDI tools from NewTek’s official website here.
4. On the taskbar, set the NDI Webcam Input. Right-click the Webcam Input logo and choose your MultiView NDI output channel expanded from your computer name. Here is our example:
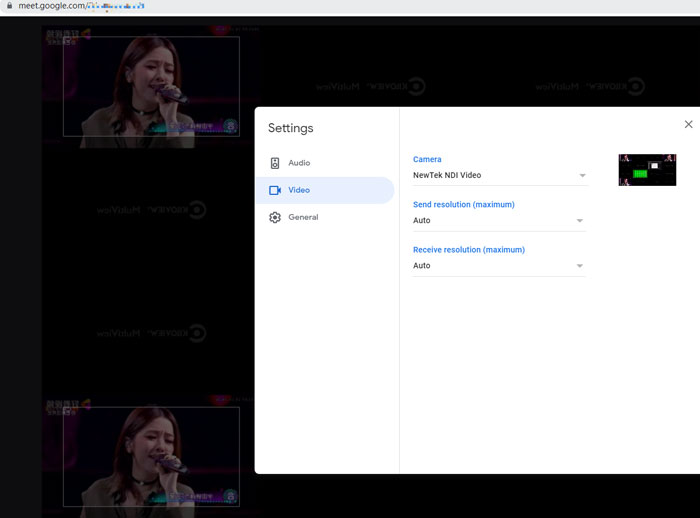
5. Open your IM App, go to settings. In this case, we use Google Meet, for example. Click the “New meeting” button and choose “start an instant meeting”.
6. Go to the “Video” panel, select “NewTek NDI Video”. When you do this, the preview interface will discover your NDI virtual camera output from Kiloview MultiView and display it in real-time.
7. Join a Conversation, and adjust your audio device or video effect. Now your team member can see your virtual NDI video instead of a real webcam. You can drag more videos, replace positions, change video settings (resolutions, fps, etc.), add effects, and do more in the MultiView control portal.
More Solution: VLC + NDI5 (NDI Input, NDI Output)
VLC is a free and portable media player. You can use it to play NDI video and output the NDI stream. This player is known for playing HTTP, RTP, MMS, RTSP streams (it means that you can view an RTSP stream and output it as an NDI stream in VLC).
For NDI stream functions, one thing should be noted: it cannot get NDI in and send NDI out at the same time.
How to enable NDI input in VLC Player (to get an NDI stream)?
1. Download the player and run it. Make sure you have the latest version.
2. Prepare your NDI source. Try OBS virtual camera (introduced above) or NDI Webcam Input tool to create a test source.
3. Open VLC, go to “Tools” -> “Preferences” -> “Video”. Make sure the dropdown menu item for “Output” is “Automatic” or “OpenGL video output for Windows”.
4. Go to “Media” -> “Open Capture Device”. You can press Ctrl + C to open it also.
5. Select your NDI source from the “Video device name” dropdown menu. For audio devices, select the relevant NDI source too.
How to enable NDI output in VLC Player (to output as an NDI stream again)?
1. Open the VLC player, and check the version. As NDI output is a new property added with the announcement of NDI 5, so if it is lower than 3.0.12 Vetinari, you may not find the option.
2. Go to “Tools” -> “Preferences” -> “Video”. Make sure the dropdown menu item for “Output” is “NDI video output”.
3. Go to “Tools” -> “Preferences” -> “Audio”. Make sure the dropdown menu item for “Output” is “NDI audio output”.
4. Grab a test video (of any protocol), and play it. Your player screen may stay black after you selected a source. But that’s OK because you will see the right NDI stream in another player.
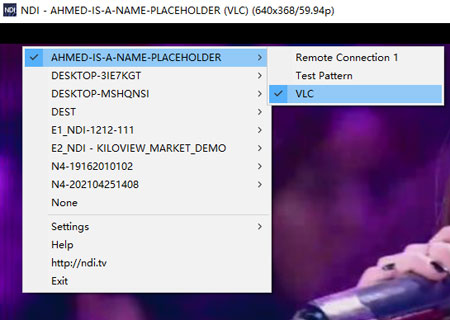
5. Open another NDI detector (we suggest the free Studio Monitor from NDI tools). You can see the VLC channel under your computer name and view it:
How to enable NDI virtual camera output in VLC player (export any video as a virtual webcam in Skype, Zoom, Meet, or Teams)?
Currently, there is not a virtual camera built-in VLC. You can choose another application or output to NDI webcam input (like you just see on Kiloview MultiView Solution).
More Solution: vMix (NDI Input, NDI Output, Virtual Camera Output)
vMix is a professional video production software that is popular among A/V producers. It is a paid application, but you have two months of the free trial. As it also has NDI built-in, you can use it for the input and output tasks.
How to enable NDI input in vMix (to get an NDI stream)?
1. Download the software from the vMix official website. Use the free trial portal to open it.
2. Click “Add Input” on the left bottom to add a video source.
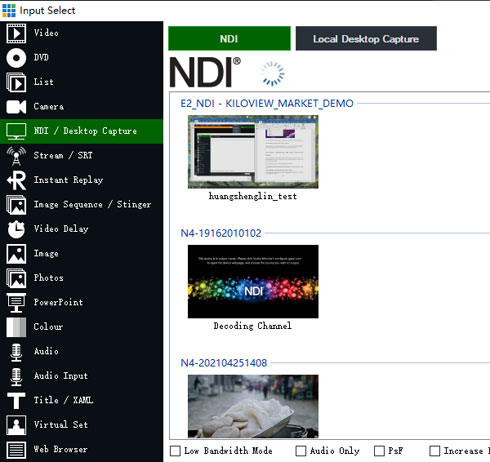
3. On the pop-out window, click the “NDI / Desktop Capture” option. And you will see a list of available NDI sources.
4. Double click on your target source to preview it. You can use the “Cut” button (in the middle) to change the video position between the preview and output window.
How to enable NDI output in vMix (to output as an NDI stream again)?
1. Open vMix, and add your NDI video.
2. Click “Cut” to move it to the output window (the one on the right and with the green bar). The fact is, when you move your NDI video to the right side, it is prepared for output.
3. Open another NDI detector (we suggest the free Studio Monitor from NDI tools). You can see the vMix channel under your computer name and view it:

4. “Cut” the video in vMix again to show/hide the NDI output.
How to enable NDI virtual camera output in vMix (export any video as a virtual webcam in Skype, Zoom, Meet, or Teams)?
1. Open vMix, and add your NDI video.
2. Click “Cut” to move it to the output window (the one on the right and with the green bar).
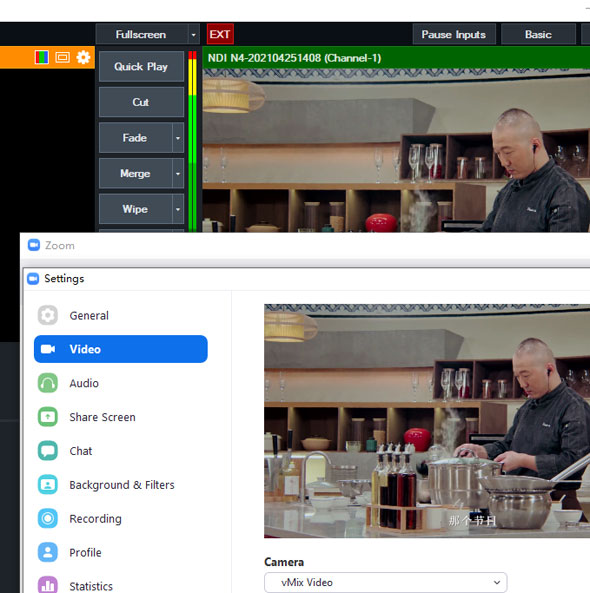
3. Click the “External” button to activate NDI virtual camera output. After that, you will see an “EXT” badge on top of the right screen.
4. Open your IM App, go to settings. In this case, we use Zoom, for example.
5. Go to the “Video” panel. In the “Camera” dropdown menu, select “vMix Video”. Then you will see the real-time video appears on the setting screen.
Now your partner can see your virtual NDI video in the video call instead of a real webcam. You can add more effect on vMix when outputting the NDI stream.
More Solution: Hardware Media Gateway
A hardware media gateway processes a variety of video streams, including NDI, and distributes the stream effectively.
It gets the NDI video stream both online (from the local network) and offline (from the NDI hardware encoder). In the web-based GUI, you can also configure all things easily.
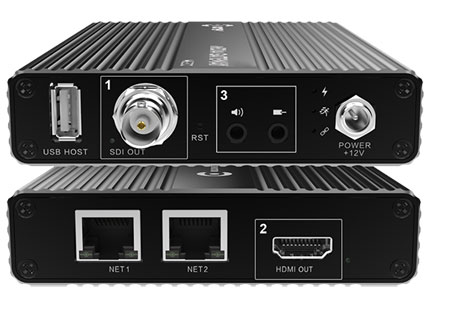
Here we take Kiloview media gateway MG300 as an example.
How to enable NDI input in MG300 (to get an NDI stream)?
1. Initialize the device by setting network information. You can find a detailed guide here.
2. Open your browser, go to the web GUI. Your computer should be in the same network as the hardware media gateway.
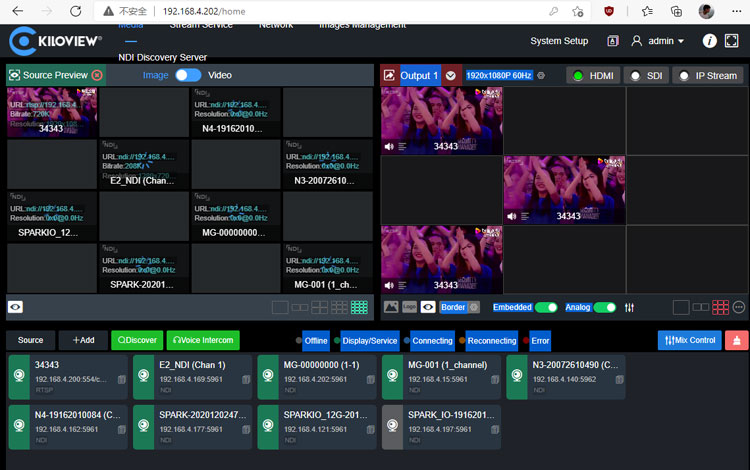
3. On the lower part, click the “Discover” button to find NDI sources. There should be a list of automatically detected NDI sources in your network.
By the way, if you click the “+Add” button. You can add more input streams such as RTSP, RTMP, RTP, HTTP, UDP, SRT, or even host an RTMP server.
4. Choose the target source, and add it. After it appears on the bottom of the page, drag it up to the preview window or output window.
5. Adjust the layout for preview and output. You will find it helpful to preview multiple NDI streams simultaneously (just as you have seen in the Multiview interface).
How to enable NDI output in MG300 (to output as an NDI stream again)?
1. Connect your MG300 to the same network as your NDI sources.
2. log in to your web console, add your source and drag them to the right window (output window). The stream source can be of any type. Please note that you can have more than one output video.
3. Check the “IP Stream” output option on the top right. Make sure it is selected, so you can use it later in the output option.
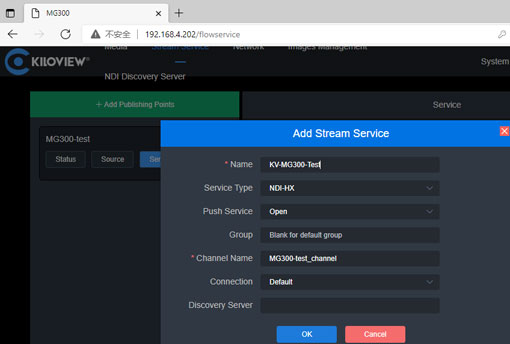
4. Click “Stream Service” on the page navigation.
5. In the “Stream Service” tab, click “+Add Publishing Points” and give it a name.
6. In the new publishing point you just created, click the “source” option and choose your output target. The one named “Output 1” is the IP stream you created in step 3. But you can select any video listed here.
7. In the new publishing point you just created, click the “Service” option and choose your output protocol.
8. When you add a new stream service, choose “NDI-HX” in the stream type field. You can leave the other option as default.
9. Launch another NDI viewer and check your stream. Your NDI stream is going out from MG300 now. By repeat step 6, you can control the output target conveniently.
How to enable NDI virtual camera output in MG300 (export any video as a virtual webcam in Skype, Zoom, Meet, or Teams)?
Currently, there is not a virtual camera built-in MG300. However, you can output your IP stream to OBS Studio and restream the NDI out via the OBS camera.
To Wrap up
There are five software solutions (OBS Studio, Streamlabs OBS, Kiloview Multiview, VLC Player, and vMix) and one hardware solution (MG300 media gateway) to get your NDI stream output.
Each tool is good at processing the incoming NDI stream: image overlay, size cropping, source switching, audio mixing, multi-window displaying, color effects, and so on.
What do you think about these NDI tools? Let us know if you like any of the streaming software/hardware above, and comment below on your NDI stream problems. If you are interested in an NDI hardware encoder or converter (such as the MG300 above), please contact us now.