

Table of Contents:
- What is OBS Virtual Camera
- Before you Start
- Use OBS Virtual Camera in Skype (Video Source: File)
- Use OBS Virtual Camera in Zoom (Video Source: Screen Capture)
- Use OBS Virtual Camera in Teams (Video Source: Office, Browser, and more Apps)
- Use OBS Virtual Camera in Google Meet/Messenger Rooms (Video Source: Game)
What is OBS Virtual Camera
In video conference software like Skype, Zoom, Teams, Google Meet, or Facebook Messenger Rooms, you can find a video source option named “OBS Virtual Camera” in the settings. And you may wonder what it is and how to use the virtual camera in the IM software.
In a nutshell, OBS virtual camera lets you use a media resource (video file, screenshot, App, game, etc.) as the camera output to Skype, Zoom, Teams, Meet, or more IM Video calls. Your conference partner will see the video source you just set instead of your face from the webcam.
An OBS virtual camera is very useful if you want to:
- Not to show your face in the real webcam;
- Do an online business presentation to your customers or co-workers;
- Watch a movie with your best friends in the video call;
- Have an online class with your student;
- Give a demonstration by a real-time screen capture;
- Have fun with your friends online during the COVID-19;
This article will show you how to use this powerful tool to satisfy your business partner, fulfill your tasks at home, and share your happiness in your video call.
Before you Start
You need to install the following software (all free) to get started. Some of the tools in the list are not mandatory but will give you a better experience in expanding the choices of your video sources:
- OBS Studio. OBS studio is required for the “OBS virtual camera” option in your IM (or video conference) software. In addition, if you want to use the “OBS-camera” option, you need to download another App called Streamlabs OBS or SLOBS.
- NDI Tools. If you need a free solution to capture another computer’s screen, you will have to install NDI tools on your computer.
- OBS-NDI plugin. You need to install it to get the NDI signal in OBS.
- VLC Media Player. Useful for multiple video playing.
(2021 Update: you don’t need to install a virtual camera plugin for OBS, as it is natively supported in the software.)
Use OBS Virtual Camera in Skype (Video Source: File)
In this section, you will see an example of an OBS virtual camera in Skype. In the example, we will use a video file as the virtual camera video source. If you want to share a movie, an artwork video, or any video file with your partner, go through the following steps in Skype:
1. Open your Skype, and update it to the newest version.
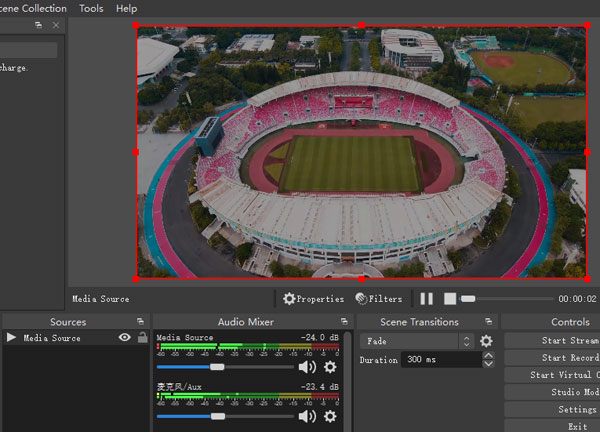
2. Install and Open OBS Studio. In the “sources” panel, add a new one, and choose “Media Source.”
3. In the pop-up “Properties” window, choose your video. Tick the “Loop” option if necessary. Now you can see the video repeatedly playing in the OBS preview area.
4. Open Skype, go to “Settings” -> “Calling” -> “Advanced” -> “Allow NDI usage”, enable it.
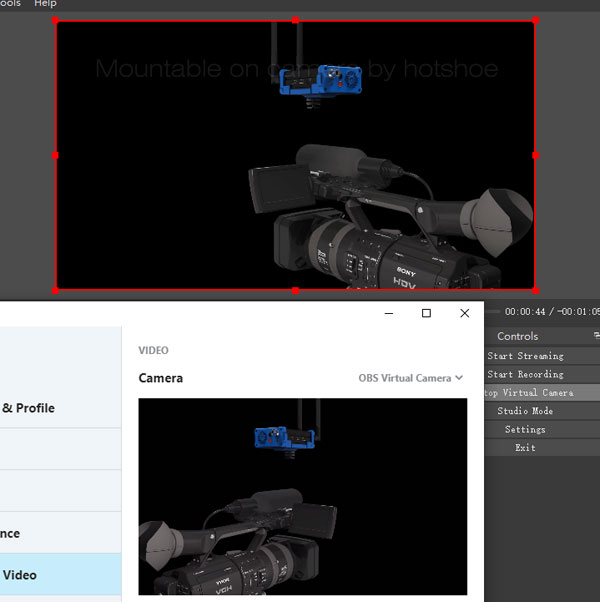
5. In the settings, go to “Audio & Video,” choose “OBS Virtual Camera” for the “Camera” option. Now you can see the static image cover.
6. Go back to OBS, click the “Start Virtual Camera” button under the “Controls” panel. Now you can see the video playing in the Skype settings panel (sometimes the video is in a mirrored effect, but don’t worry, your partner will see it in the normal direction).
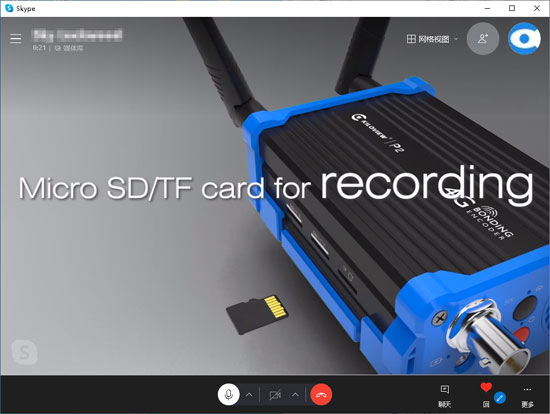
7. Call someone now, and they will see the video you put on OBS:
Here are the steps for enabling OBS virtual camera in Skype with a video file. This works on Zoom, Microsoft Teams, Google Meet, and Facebook Messenger Rooms also.
In some cases, you may want to play a list of videos on a Skype virtual camera. Then we need to choose another type of video source. Just follow the steps below:
8. Install the VLC player, and restart your OBS.
9. Create a new scene, or delete the “Media Source” you just created in step 2.
10. Add a new source, choose the new option “VLC Video Source.”
11. In the pop-up “Properties” window, choose your video by adding a directory.
After that, you will see a list of videos (from your directory) playing as the virtual camera source.
Use OBS Virtual Camera in Zoom (Video Source: Screen Capture)
In this section, you will see a detailed example of sharing your real-time screen capture in a Zoom meeting using an OBS virtual camera.
1. Open your Zoom, and update it to the newest version.
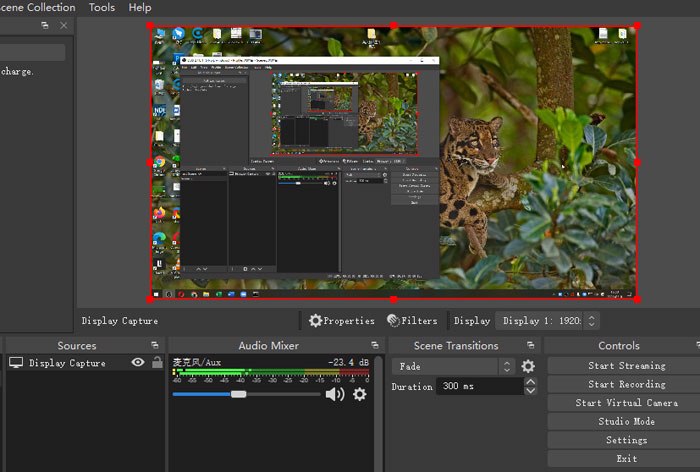
2. Install and open OBS Studio in the “sources” panel, add a new one, and choose “Display Capture.”
3. In the pop-up “Properties” window, choose “Automatic” and “Display 1” for capture method and display options. Now you can see a real-time screen capture in the previewing window.
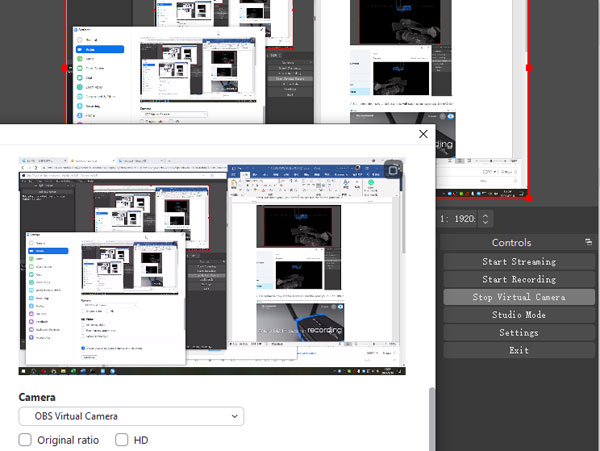
4. Open Zoom, go to “Settings” -> “Video,” choose “OBS Virtual Camera” for the camera option. Now you can see the static image cover.
5. Go back to OBS, click the “Start Virtual Camera” button under the “Controls” panel. Now you can see the video playing in the Zoom settings panel.
6. Launch a meeting now, and all the meeting members will see the screenshot you put on OBS.
Here are the steps for enabling OBS virtual camera in Zoom with a screen capture. This works on Skype, Microsoft Teams, Google Meet, and Facebook Messenger Rooms also.
Use OBS Virtual Camera in Teams (Video Source: Office, Browser, and more Apps)
Sometimes you may want to share a real-time action on specific Apps (such as Office, browser, and any other software) with someone online. You will get the utmost efficiency if you make a Teams video chat and show them the Apps in the camera zone.
Here we use Microsoft Teams as an example to show you how to put your Apps into the OBS virtual camera and share it to the video chat.
1. Open your Teams, and update it to the newest version.
2. Prepare your source target. For example, you can open your Chrome.
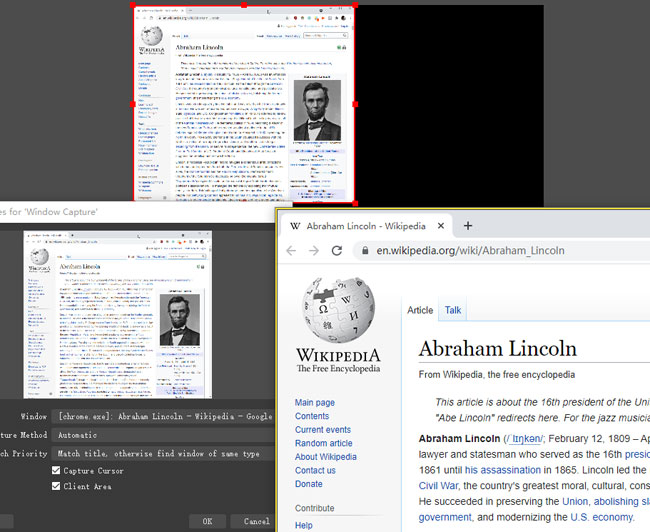
3. Install and open OBS Studio in the “sources” panel, add a new one, and choose “Window Capture.”
4. In the pop-up “Properties” window, choose “chrome.exe” you just opened in step 2 and leave the rest options by default. Now you can see your Chrome is bordered with a yellow line. Meanwhile, a real-time preview appears on your OBS.
5. Open Microsoft Teams, go to “Settings” -> “Devices,” choose “OBS Virtual Camera” for the camera option. Now join a video meeting, and you can see the static image cover for OBS.
6. Go back to OBS, click the “Start Virtual Camera” button under the “Controls” panel. Now you can see the video playing in the Teams meeting window (sometimes the video is in a mirrored effect, but don’t worry, your partner will see it in the normal direction).
7. (optional) Drag the chrome window to fit well. You can do this during the meeting also.
8. Launch a meeting now, and all the meeting members will see the specific App you put on OBS.
Here are the steps for enabling OBS virtual camera in Teams with an App capture. This works on Skype, Zoom, Google Meet, and Facebook Messenger Rooms also.
Use OBS Virtual Camera in Google Meet/Messenger Rooms (Video Source: Game)
Google Meet and Facebook Messenger Rooms are two popular online meeting platforms. This section will show you how to capture a game on your computer and share it by the OBS Virtual Camera of these two chatting Apps.
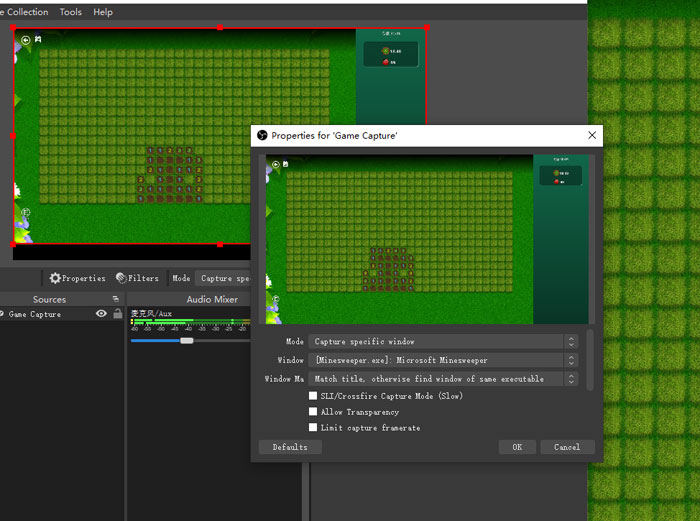
1. Prepare your game. In this example, we will use Minesweeper for a test.
2. Install and open OBS Studio in the “sources” panel, add a new one, and choose “Game Capture.”
3. In the pop-up “Properties” window, choose “Fullscreen application” or “specific window” according to your game property, and leave the rest options by default. After that, you can see a real-time game preview appears on your OBS.
4. Open Google Meet or Facebook Messenger Rooms. Join a meeting, and go to settings. In the camera option, select “OBS Virtual Camera,” and you can see the static image cover for OBS.
5. Go back to OBS, click the “Start Virtual Camera” button under the “Controls” panel. Now you can see the game video playing in the Google meet or Facebook Messenger Rooms window.
6. if you are on a video call, your friends will see your game running on the camera area.
Here are the steps for enabling OBS virtual camera in Google Meet and Facebook Messenger Rooms with a game capture. This works on Skype, Zoom, and Microsoft Teams also.
To Wrap it up
Using OBS virtual camera in video meeting software is amazing. You can share a video file, a presentation, a screen capture, a game, and any media source existing on your computer with your friends, colleagues, or customers.
To use your own media video source in Skype, Zoom, Teams, Google Meet, Facebook Messenger Rooms, you need to install the relevant software and following the steps above. If you have any questions about how to use it, please comment below.